KenKem GOLD Scalping BotTradingView Indicator Guide
The official setup and usage guide for KenKem GOLD Scalping Bot (aka KenKem SuperBros Edition) on TradingView. It covers every configurable setting, how to read the chart, and how to set up alerts. Visit kenkem.biz for pricing and access.
👋1. Introduction
Trading rarely runs in a straight line. Most traders hit losing streaks, get rattled by news spikes, and burn cycles second-guessing every entry. KenKem GOLD Scalping Bot isn’t built to fix that — it’s built to take the noise out of execution so you can focus on the part only you can do: deciding whether to take the setup.
Three goals shaped the design:
- Decision support, on-chart, in real time. Entry, SL, TP1, TP2, and a reference lot size are drawn directly on your chart the moment a setup forms.
- An honest learning surface. Replay sessions, study how each filter fired, and sharpen your read of XAUUSD across hundreds of setups without committing capital.
- A calmer trading routine. Pre-defined risk, structured R:R, and session/news filters do the bookkeeping so you stop trading on emotion.
For pricing and access, visit kenkem.biz.
The bot does not replace discipline and it does not eliminate risk. XAUUSD remains one of the most volatile instruments on the planet, and major news or geopolitical events can produce extreme price spikes. What the bot does is reduce the volume of emotional decisions: it spells out Entry/SL/TP, pre-computes lot sizes, and records outcomes on the chart. The discipline — entering consistently, staying calm in losses, and respecting the risk you set for yourself — still belongs to you.
✨2. What Makes the KenKem Bot Stand Out
- Absolute visual clarity. Every entry mirrors how Ken & Kem analyze the chart in live community sessions — no hidden logic, no guesswork.
- Multi-timeframe trend filter. Entries fire only when the M1/M3/M5 trend structure aligns, cutting trades that fight the prevailing direction.
- Sideways detection across timeframes. When chop is detected on multiple horizons at once, entries pause — no more bleeding equity in low-quality regimes.
- Session filter (Asia / EU / US, JST-anchored). The bot stays inside high-liquidity windows, with an optional force-close at session end.
- Fixed R:R with partial TP1. Books partial profit at TP1, slides SL to breakeven, and lets the rest run to TP2.
- Smart sideways exit. If chop appears mid-trade, the bot can flag an early exit before a full SL hit develops.
- Auto lot sizing from Max Risk USD. You set the dollar amount you accept losing per trade. The bot does the math from the Entry → SL distance and prints the reference lot directly on the chart.
- Daily & weekly P&L summary on chart. Win/loss counts and pip totals drawn at session boundaries — no spreadsheet required.
- Indicator-log alerts (companion bonus). Passive logs of what the indicator just drew (e.g. “Detected LONG hint”, “Stop level reached”) — not real-time trade calls and not financial advice. Every alert payload opens with the disclaimer line
- © kenkem.biz · Bot logs, not financial advice -, and entry-setup logs include a $10–$50 risk-to-lot-size examples table also explicitly labelled “not financial advice”.
🎚️3. Editions — Free vs Premium
Free and Premium ship the same core engine — same multi-timeframe trend filter, same sideways detection, same news/session protection, same alert system. Premium layers on tunable settings, multi-symbol support, trade-quality filtering, adaptive risk management, and a smart trailing stop.
| Feature | Free | Premium |
|---|---|---|
| Symbols supported | XAUUSD only | XAUUSD + multi-symbol (BTCUSD, ETHUSD, and others) |
| Risk per trade (USD) | Configurable | Configurable |
| Risk:Reward ratio (base) | Locked | Configurable |
| Volatility-based R:R tuning (per-session × volatility band) | — (locked flat) | Configurable |
| TP1 partial close + SL-to-breakeven | Yes | Yes |
| Multi-timeframe trend filter | Yes | Yes |
| Sideways detection (multi-TF) | Yes | Yes |
| Weak momentum guard | Yes | Yes |
| News avoidance filter | Yes | Yes |
| Session filter (Asia / EU / US) | Yes | Yes |
| Force close at session end | Yes | Yes |
| Extreme momentum exit | Yes | Yes |
| Extreme momentum entry | — (locked off) | — (locked off) |
| Trend quality filter (configurable threshold) | — | Yes |
| Adaptive volatility-aware SL | — | Yes |
| Smart Trailing Stop (pre / post-TP1) | — | Yes |
| Daily / Weekly P&L summaries on chart | Yes | Yes |
| TradingView alerts (App / Email / Webhook) | Yes | Yes |
What Premium adds — the honest list, no fluff
- Multi-symbol. Same engine on BTCUSD, ETHUSD, and other symbols — not just gold.
- Configurable Risk:Reward (base). Tune the win-rate vs. average-win balance to fit your style instead of being locked to a fixed value.
- Volatility-based R:R tuning. Scale the base R:R per session (Asia / London / NY) and by current volatility band so the effective TP2 distance adapts to the regime. Free builds ship flat (every multiplier locked at 1.0).
- Trend quality filter. A composite gate that blocks low-conviction setups before they fire, with a threshold you control.
- Adaptive volatility-aware SL. Wider in volatile markets, tighter in calm ones — more consistent risk per trade across regimes.
- Smart Trailing Stop. Pulls SL closer once price moves in your favor before TP1, then trails behind price after TP1 to let winners run further.
- Multi-TF momentum-aligned alert. Heads-up alert when momentum agrees across the internal multi-timeframe stack — a Premium-only companion line.
- Conviction + Vol-band tag block. Every entry-setup alert includes a qualitative “Conviction: … | Vol band: …” line so you can read the regime context at a glance.
Pick Free if you only trade XAUUSD on the entry timeframe, you’re comfortable with the locked Risk:Reward ratio and the default session windows, and you want the core entry layer with all the standard protective filters.
Pick Premium if you also scalp BTCUSD or other symbols, you want to tune the base R:R and its per-session × volatility-band multipliers, you want trade-quality filtering plus adaptive risk management, or you want the trailing-stop layer to capture larger winners.
🧩4. Feature Overview
KenKem GOLD Scalping Bot ships as a TradingView Indicator (visual overlay). Here is the full feature set at a glance.
Chart visuals
- EMA 200 trend line
- Trend zone background shading (bull/bear regimes)
- Status table (bottom-right corner)
- Entry/exit labels with full trade details
- SL / TP1 / TP2 horizontal level lines
- Daily & weekly P&L summary labels
Note: Calculated P&L in pips (pip size: 0.1) is intended for quick reference only. The number does not currently weight the difference between TP1 and TP2 fills.
Risk & sizing
- Max Risk Per Trade (USD) — user-adjustable
- Risk:Reward Ratio — user-adjustable (Premium); fixed at 1.5 (Free)
Sessions
- Session start/end times — user-adjustable
- Force Close at Session End — user-adjustable
- Ignore Sessions (24/5 mode) — available, not recommended
Filters & guards
- News Avoidance filter
- Sideways detection & mid-trade handling mode
- Weak Momentum guard
- Entry Quality Score
- Extreme Momentum exit
- Extreme Momentum entry (Premium)
- Smart Trailing Stop (Premium)
- Adaptive volatility-aware SL (Premium)
Alerts
- TradingView alerts via App / Email / Webhook
- Works on any symbol the indicator is loaded against
⚙️5. Installation
Five minutes, start to finish.
- Open TradingView and load an XAUUSD chart from OANDA.
- Set the chart timeframe to 1 minute (M1).
- Open the Indicators panel (top toolbar or the
/shortcut). - Switch to the Invite-only scripts tab and click KenKem GOLD Scalping Bot.
- The indicator drops onto your chart.
- Click the ⚙ gear icon next to the indicator name to open Settings.
The Settings dialog has three tabs: Inputs, Style, and Visibility. Configure each as described below.
🛠️6. Inputs Tab
The Inputs tab controls every behavior the bot exposes. Defaults are sensible — change them deliberately.
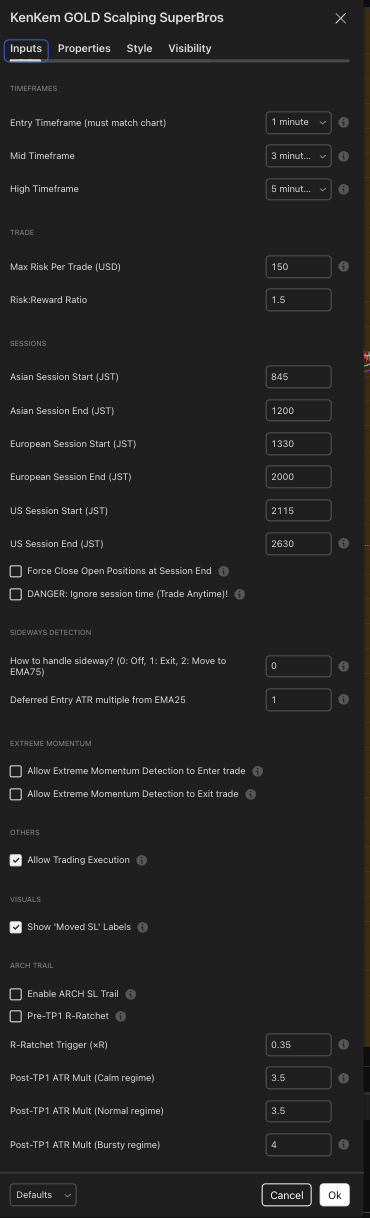
6.1 Timeframes
Fixed. Not user-configurable. The bot reads multiple timeframes internally to triangulate market state. Your chart must be on the entry timeframe shown in the status table — a red warning overlay appears if it isn’t.
6.2 Trade Parameters
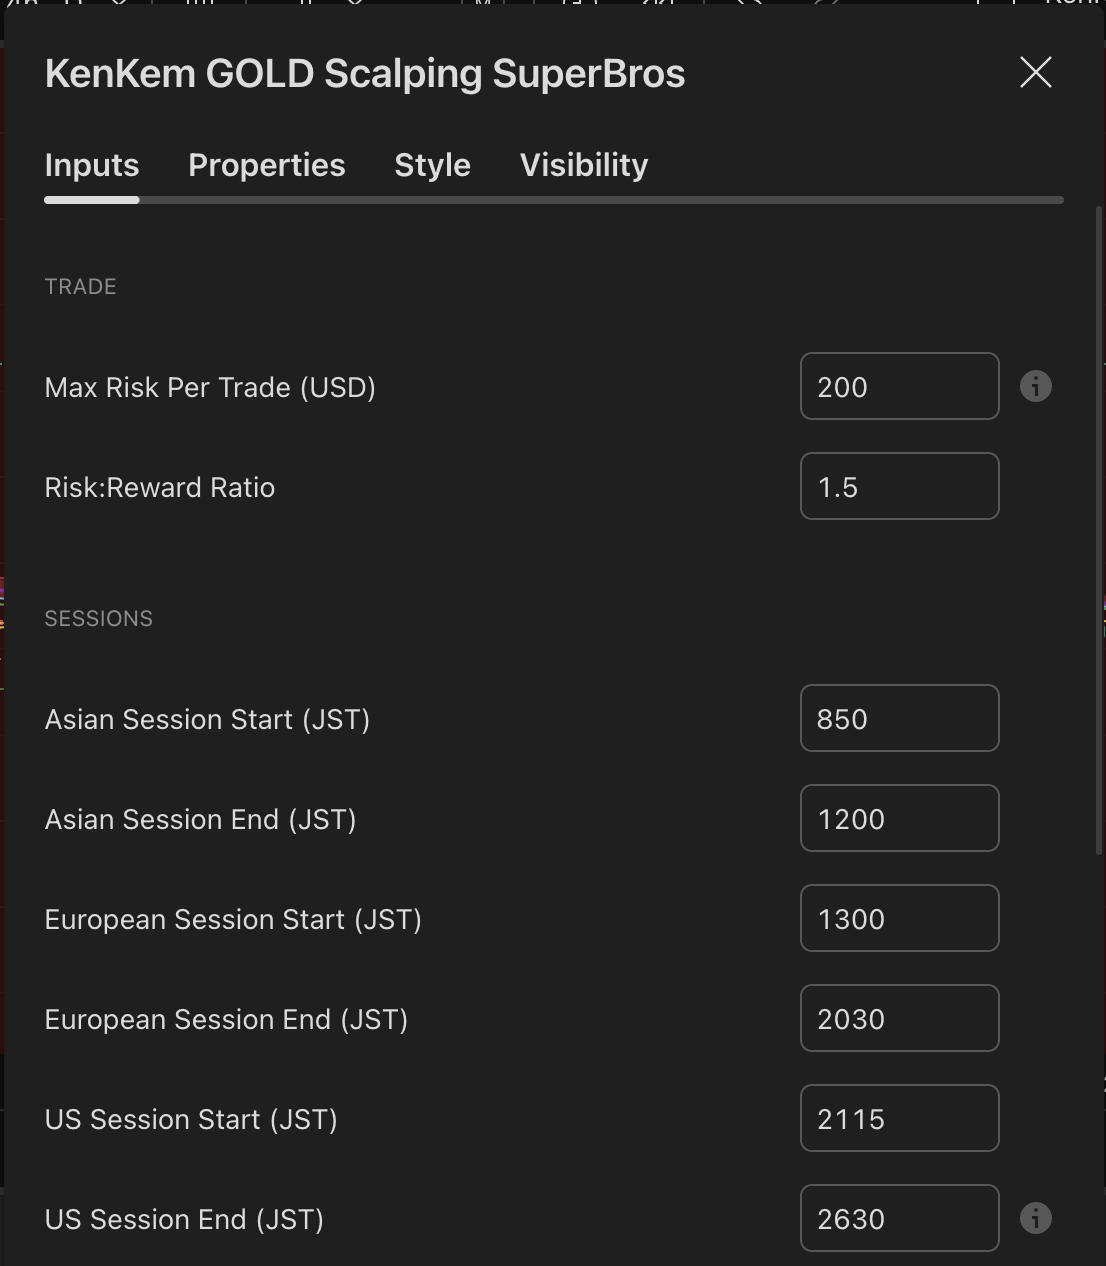
| Setting | Default | What it does |
|---|---|---|
| Max Risk Per Trade (USD) | 100 | The dollar amount you accept losing if SL hits. The bot computes the reference lot size from this value and the current Entry → SL distance — wider SL, smaller lot. Set this to fit your personal risk tolerance. |
| Risk:Reward Ratio (base) | (locked default) | Base R:R applied to TP2. The configured ratio places TP2 at that multiple of the SL distance beyond entry. Example formula: if Entry = 3310.00 and SL = 3305.00 (5.0 pts = 1R), TP2 = Entry + (Ratio × 5.0 pts). Free locks this to its tested default; Premium exposes it as a configurable input and can additionally scale it by session and volatility band — see below. |
TP1 mechanics. When TP1 hits, a partial portion of the position closes. SL then moves to entry (breakeven) and the remainder runs toward TP2.
Volatility-Based Risk:Reward (Premium)
Premium can scale the base R:R per session and per volatility band: effective TP2 R:R = base R:R × session multiplier × volatility multiplier. The R:R is locked at entry and is not reshuffled mid-trade. The master switch ships OFF, so a fresh Premium install behaves identically to the flat Free baseline until you turn it on.
| Setting | Default |
|---|---|
| Enable Volatility-Based R:R | OFF |
| RR multiplier — Asia | 1.00 |
| RR multiplier — London | 1.09 |
| RR multiplier — NY | 1.16 |
| RR multiplier — small range | 0.87 |
| RR multiplier — big range | 1.03 |
| Scale TP1 according to TP2 | OFF |
Free. Group is hidden and every multiplier is locked at 1.0 — effective R:R always equals base R:R. Sweep one cell at a time when tuning and re-validate against the same backtest window before claiming an improvement.
6.3 Sessions (JST = UTC+9)
All times are Japan Standard Time, 24-hour format with no colons. Values above 2400 represent times after midnight (e.g. 2630 = 02:30 next day).
| Setting | Default | What it does |
|---|---|---|
| Asian Session Start | 900 | 09:00 JST. No new entries before this. |
| Asian Session End | 1500 | 15:00 JST. |
| European Session Start | 1600 | 16:00 JST. |
| European Session End | 2000 | 20:00 JST. |
| US Session Start | 2130 | 21:30 JST. |
| US Session End | 2530 | 01:30 JST next day. |
| Force Close at Session End | OFF | When ON, all open positions close the moment a session ends. When OFF, positions carry across sessions and only close on SL or TP. |
| DANGER: Ignore session time | OFF | When ON, the bot trades 24/5 with no session filter. Keep it OFF — low-liquidity hours produce unreliable entries. |
Out-of-session visual. A gray background marks bars outside all configured sessions. No new entries are placed during this time.
6.4 News Avoidance
| Setting | Default | What it does |
|---|---|---|
| Avoid News Trading | ON | Trading pauses around high-impact USD releases (NFP, CPI, FOMC, GDP, Jobless Claims). Open positions are force-closed and new entries are blocked during the window. |
| Minutes Before News to Avoid | 15 | Minutes before a release to start blocking entries. |
| Minutes After News to Avoid | 15 | Minutes after a release before resuming normal trading. |
The bot learns past release times from chart history and pre-blocks the same windows on future weekdays automatically. A blue background marks bars inside a news avoidance window.
6.5 Sideways Detection
The bot continuously evaluates whether the market is trending or chopping. When multiple timeframes simultaneously show sideways conditions, entries are blocked even if your current chart timeframe looks fine on its own.
| Setting | Default | What it does |
|---|---|---|
| How to handle sideway? | 0 | What happens to an active open trade when sideways is detected mid-trade. 0 = Off (let SL/TP play out) · 1 = Exit early (close immediately) · 2 = Tighten SL (move SL closer instead of closing). |
Status table rows:
- Current TF: Sideway? — 🟢 No · 🟡 Risky · 🔴 Yes – Risky. Numeric score in parentheses.
- All TFs: Sideway? — 🔴 Yes – Risky when the majority of internal timeframes are sideways · 🟢 No otherwise.
6.6 Weak Momentum Guard
Always active. Not user-configurable — values are fixed internally.
This filter blocks entries when the market lacks clear directional momentum. Both overall trend strength and the conviction gap between buyers and sellers must be weak at the same time — one condition alone is not enough to block a trade.
6.7 Extreme Momentum
Detects when price plus multiple momentum and direction readings all surge together in the same direction with unusual strength.
| Setting | Default | What it does |
|---|---|---|
| Allow Extreme Momentum to Enter trade | OFF (locked) | The Extreme-Momentum entry path is locked OFF in every public build (Free and Premium). The toggle is hidden — you cannot enable it from the Inputs tab. Treat the indicator as a pullback / continuation tool only. |
| Allow Extreme Momentum to Exit trade | OFF | When ON, a strong burst in the opposite direction can close an active trade early to bank gains before a reversal develops. Default OFF — turn ON if you want the bot to react to sudden reversal momentum mid-trade. |
| Only fire Extreme Exit when trade is NOT yet in profit | ON | Safety guard: only fires the extreme-momentum exit when the trade is not yet in profit. Prevents cutting winning trades short while still protecting against sudden reversals on losing trades. |
6.8 Smart Trailing Stop (Premium)
Actively manages SL after entry in two phases:
- Before TP1 — once price moves a configurable distance in your favor, SL is pulled closer to lock in partial gains. Prevents a winning trade from reversing all the way back to original SL.
- After TP1 — SL trails behind price to let winners run further toward TP2 while locking in increasingly larger profits.
| Setting | Default | What it does |
|---|---|---|
| Enable Smart Trailing Stop | ON | Master switch for both the pre-TP1 ratchet and the post-TP1 trail. Turn OFF to revert to standard breakeven-hold behavior after TP1. |
| Pre-TP1 Profit Ratchet | ON | Once price reaches a profit threshold before TP1, pulls SL closer to protect partial gains. |
| Profit Ratchet Trigger (×R) | 0.3 | How far price must travel (as a fraction of SL distance) before the ratchet activates. Lower = earlier protection. Higher = more room to breathe. |
| Post-TP1 Trail Style | Tight | Post-TP1 trailing-stop behavior. Tight = lock profits early (higher win rate, smaller winners). Balanced = middle ground. Wide = let winners run (bigger winners, more give-back). |
Premium-only. The Smart Trailing Stop group is hidden in Free builds and the master switch is locked OFF — Free trades use the standard breakeven-hold behavior after TP1.
6.9 Entry Quality Score (Premium)
A composite score (0–11) that evaluates trend conviction before allowing an entry. It combines trend strength, directional spread, momentum acceleration, and price action into a single gate that blocks low-quality setups.
| Setting | Default | What it does |
|---|---|---|
| Min Trend Quality Score | 5 | Block entry if the composite trend quality score is below this threshold. 0 = disabled · 6 = balanced · 8 = strict. |
Example: with a threshold of 5, the bot only enters when at least 5 of 11 trend-quality factors are satisfied. This filters out marginal setups where the trend looks directional on one timeframe but lacks confirmation elsewhere.
6.10 Adaptive Volatility-Aware Stop Loss (Premium)
SL distance auto-adjusts to current market volatility — tighter in calm markets (reaching TP1 faster), wider in volatile markets (giving the trade room to breathe). Result: more consistent risk per trade across regimes. Always active, no configuration needed.
6.11 Others
Remaining values are fixed internally and not exposed in the Inputs tab. The bot does not execute trades on any broker — it is a visual indicator with alert capabilities.
🔔7. Indicator-Log Alerts — A Companion Bonus
Read this first — what these alerts are, and what they are not.
The alerts in this section are a companion-notification bonus so you don’t have to stare at the M1 chart all day. They are:
- NOT a trade-call service.
- NOT real-time trade calls.
- NOT financial advice.
- NOT a recommendation to enter, exit, or size a position.
Every alert is a passive log of what the indicator drew on your chart. Every payload opens with the disclaimer line - © kenkem.biz · Bot logs, not financial advice -, followed by an emoji and short event description on the next line. Every entry, exit, and risk decision remains 100% yours.
The indicator never sends concrete SL / TP1 / TP2 prices, P&L numbers, “force-closed”, or “closing early” wording over the alert channel. Concrete price levels and outcomes live on your chart — open it and decide for yourself when an alert pings.
7.1 How to Create an Alert
- With the KenKem GOLD Scalping Bot indicator active on your chart, click the Alert button (🔔 icon, or
Alt+A). - In Condition, select the KenKem GOLD Scalping Bot indicator.
- Important: set the trigger to “alert() function calls only”. This is what enables the indicator’s bot-log lines — without it you’ll get TradingView’s generic crossing alerts instead.
- Set Alert actions to your preferred delivery method: Notify on app, Send email, or Webhook URL (Discord, Telegram, or custom integration).
- Set Expiration to the longest available duration. Paid TradingView plans allow open-ended alerts.
- Name the alert (e.g. “KenKem GOLD Scalping Bot XAUUSD M1 Log”) and click Create.
7.2 Reference Alert Settings
| Setting | Reference value |
|---|---|
| Condition | KenKem GOLD Scalping Bot indicator |
| Trigger | alert() function calls only |
| Expiration | Open-ended (or max available on your plan) |
| Once Per Bar Close | Leave default |
7.3 What the Alerts Contain
Every payload is wrapped in Discord-compatible JSON ({"content":"…"}) and the rendered message always begins with the disclaimer line - © kenkem.biz · Bot logs, not financial advice -, followed by an emoji and short event description on the next line. None of the lines below contain exact SL / TP1 / TP2 prices, P&L numbers, win/loss claims, “force-closed”, or “closing early” wording — those concrete details belong on the chart, not in a passive notification.
Entry-setup detection (LONG / SHORT)
Recorded when the indicator detects a fresh hint. Includes only an approximate Entry Zone (a ±4-spread band around the current close) and a $10–$50 risk-to-lot-size examples table explicitly labelled “not financial advice”. The reverse log fires for SHORT hints with a 🔴 emoji. Premium builds add an extra Conviction: … | Vol band: … line right after the Entry Zone.
- © kenkem.biz · Bot logs, not financial advice -
🟢 Detected LONG hint - XAUUSD - #0428-1430
Entry Zone: 3380.9 - 3384.1

Risk → Max Lot Size Examples (not financial advice):
$10 → 0.04
$20 → 0.08
$30 → 0.12
$40 → 0.16
$50 → 0.20
TP1 reached / SL-to-Breakeven hint
Recorded when price reaches the indicator’s plotted TP1 level — the moment when the drawn SL line moves to entry on the chart.
- © kenkem.biz · Bot logs, not financial advice -
💰 LONG TP1 reached, SL-to-Breakeven hint - XAUUSD - #0428-1430
Stop level reached / Final target reached
Recorded when price reaches the indicator’s plotted SL or TP2 level on the chart. No P&L, no win/loss claim — open the chart for the actual prices.
- © kenkem.biz · Bot logs, not financial advice -
🎯 Final target reached - XAUUSD - #0428-1430

- © kenkem.biz · Bot logs, not financial advice -
☕ Stop level reached - XAUUSD - #0428-1430
Other indicator-event logs
| Event | Rendered alert (after the disclaimer header line) |
|---|---|
| Position closed (catch-all close that didn’t go through TP/SL/sideway/extreme/session/news handlers) | ☕ / 🎯 Position closed - XAUUSD - #… |
| Multi-TF sideway market detected | 🚪 Multi-TF sideway market detected - XAUUSD - #… |
| Sideway market detected, SL/TP adjustment hint | 🛡️ Sideway market detected, SL/TP adjustment hint - XAUUSD - #… |
| EXTREME reversal momentum detected | ⚡ EXTREME reversal momentum detected - XAUUSD - #… |
| Session ended (force-close) | 🚪 <Asian / European / US> session ended - XAUUSD - #… |
| News window detected | 📰 News window detected - XAUUSD - #… |
| Pre-session warm-up (per session, ~15 min before open) | 🔔 [SESSION] <Asian / European / US> session opens in 15 min - XAUUSD Bot arming |
| Pre-news heads-up (per scheduled USD release) | 📰 [NEWS] <release name> in ~15 min - XAUUSD Bot will pause entries soon |
| End-of-session summary (only when ≥ 1 virtual trade closed) | 📈 <session> session summary - XAUUSD N trades · Win rate: X.X% · TP2 hit rate: Y.Y% |
| Multi-TF momentum aligned (Premium only) | 🟢 / 🔴 Multi-TF momentum aligned LONG / SHORT - XAUUSD Conviction: … | Vol band: … |
| Daily / weekly activity summary | 📈 / 📉 Activity summary - XAUUSD |
The disclaimer line - © kenkem.biz · Bot logs, not financial advice - is prepended to every payload above; it is not repeated per row only for readability.
7.4 Discord / Telegram Webhook Setup
To pipe these companion logs into a Discord or Telegram channel:
- Discord — Create a webhook in your channel settings (Server Settings → Integrations → Webhooks → New Webhook). Copy the webhook URL.
- Telegram — Use a bot or a webhook-to-Telegram relay service to obtain a webhook URL.
- Paste that URL into the Webhook URL field when creating the TradingView alert.
The output is formatted as Discord-compatible JSON ({"content":"…"}) so messages render cleanly with no extra configuration. The payload your webhook receives is passive log content, not a trade call — please reflect that in any community channel you forward it to.
🎨8. Style Tab
The Style tab controls which visual elements are drawn on the chart.
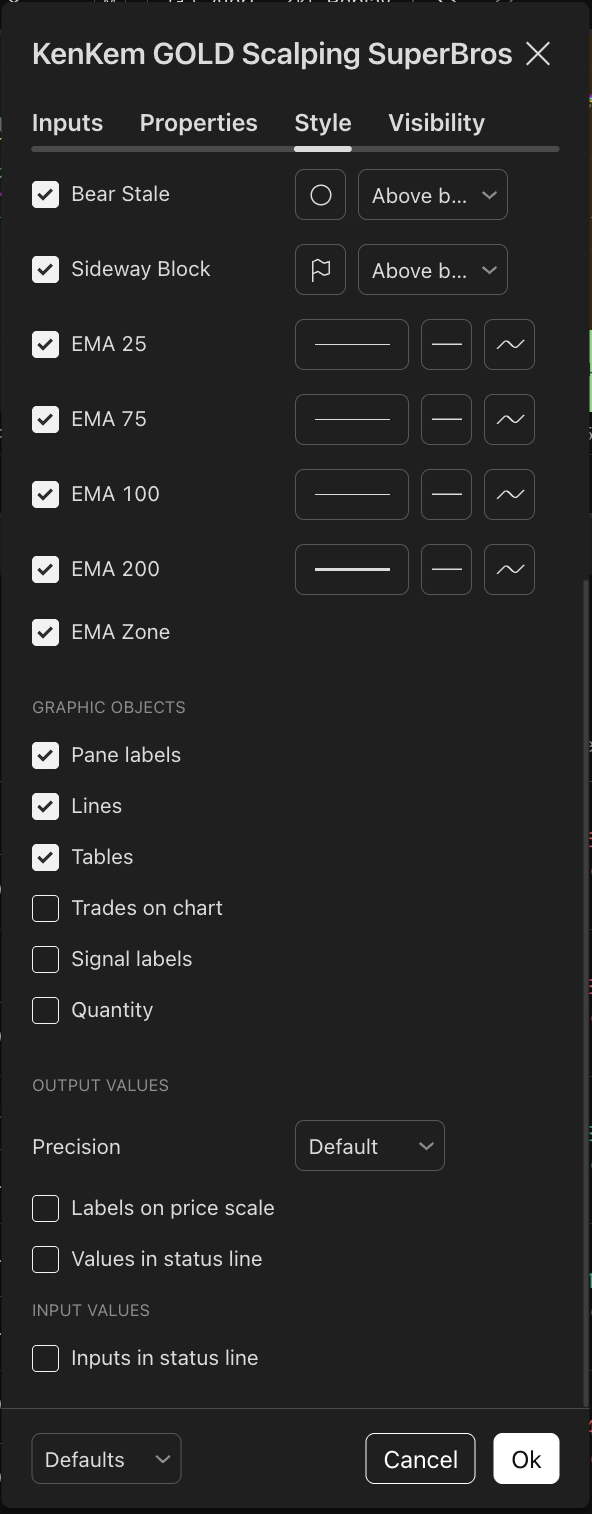
Plot Outputs
| Element | Reference | What it is |
|---|---|---|
| EMA 200 | ON | Long-term trend reference line, drawn in purple. |
| EMA Zone | ON | Shaded background — green when trend structure is bullish, red when bearish. Appears only during active trading sessions. |
Graphic Objects
| Element | Reference | What it is |
|---|---|---|
| Pane labels | ON | Entry/exit labels with direction, lot size, SL/TP levels, and P&L. |
| Lines | ON | Horizontal lines marking Entry, SL, TP1, and TP2 for each trade. |
| Tables | ON | Daily/weekly P&L summary tables drawn on the chart. |
| Trades on chart | OFF | Not applicable in indicator mode. |
| Default labels | OFF | TradingView’s built-in indicator markers — redundant with the bot’s own labels. |
Output Values
- Precision — Default
- Labels on price scale — OFF
- Values in status line — OFF
- Inputs in status line — OFF
📈9. Reading the Chart
9.1 Status Table
A compact information table appears in the bottom-right corner of the chart showing the current market state at a glance.
| Row | What it shows |
|---|---|
| Entry Timeframe (TF) | Confirms the chart is on the correct TF. Shows ⚠️ warning and orange text if the TF is mismatched. |
| Current TF: Direction | Current trend-alignment direction: Long (green, bullish zone) · Short (red, bearish zone) · Flat (gray, neutral / mixed). |
| All TFs: Direction | Combined direction across the internal multi-timeframe stack: 🟢 BULL when all timeframes lean bullish · 🔴 BEAR when all timeframes lean bearish · — when mixed. |
| Current TF: Sideway? | Current-TF sideways score with color code: 🟢 No · 🟡 Risky · 🔴 Yes – Risky. Numeric score shown in parentheses. |
| All TFs: Sideway? | Multi-timeframe sideways: 🔴 Yes – Risky when the majority of internal timeframes are sideways · 🟢 No otherwise. |
| Trend Acceleration | Composite trend quality and conviction score (0–100%) with direction: 🟢 Bull or 🔴 Bear. Higher percentages indicate stronger directional dominance. |
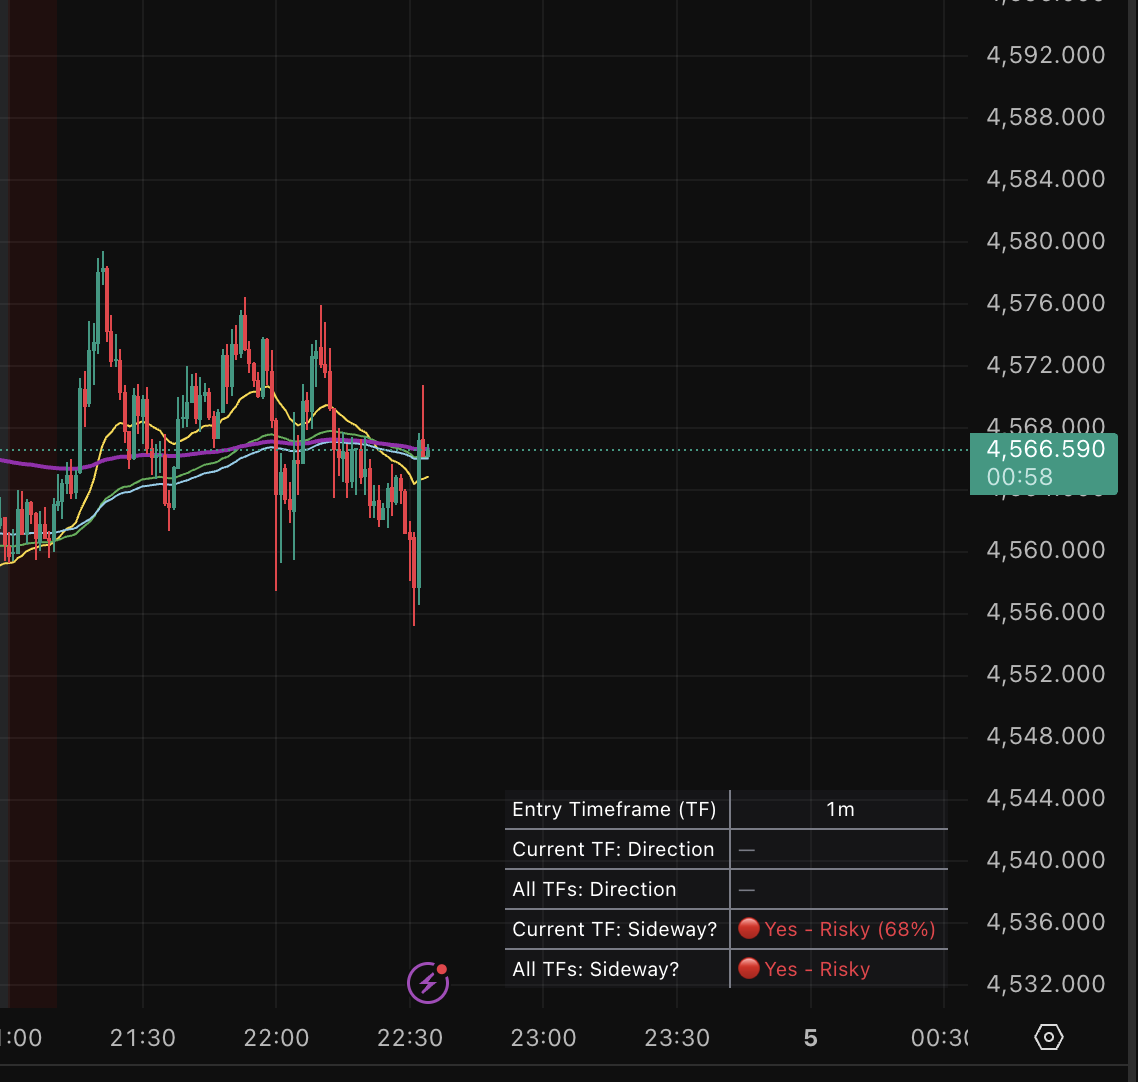
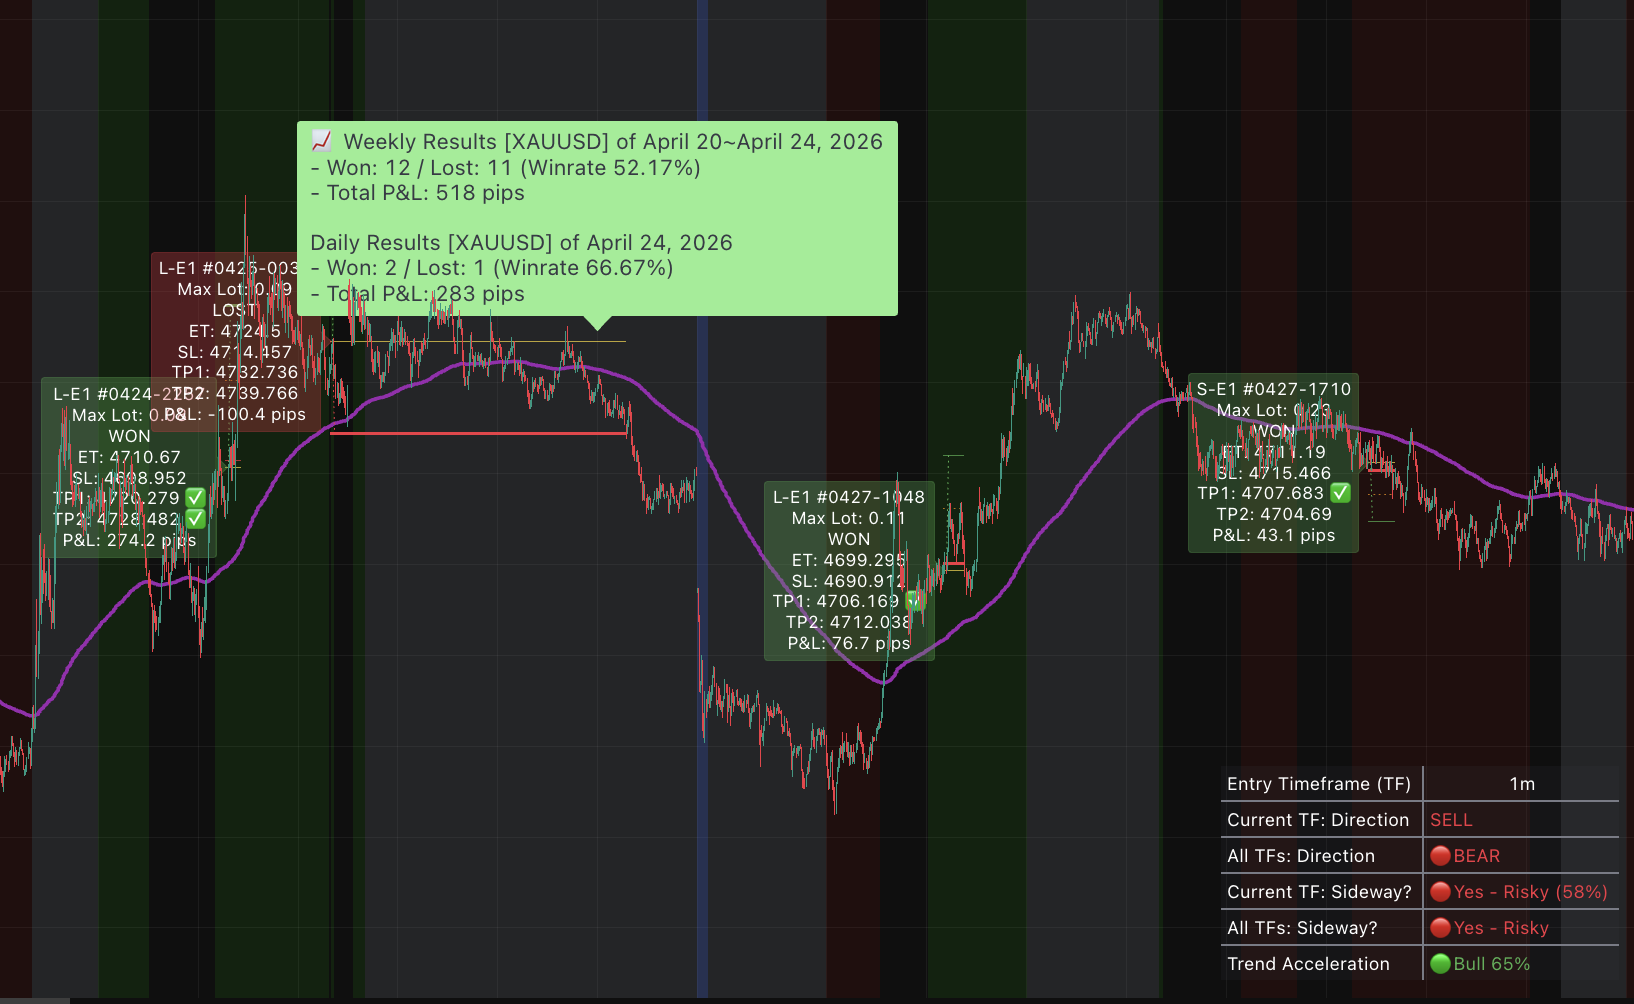
As you can see in the example above, an impatient trader could have lost a meaningful chunk of capital by entering trades during a sideway market — and may already have piled on extra entries chasing revenge trades.
9.2 Entry Labels
Each trade on the chart is annotated with a label showing:
- L-E1 / S-E1 #MMdd-HHmm — direction (L = Long, S = Short), entry type, and the trade’s timestamp magic (e.g.
#0428-1430= April 28, 14:30 JST). - Max Lot — reference lot size computed from Max Risk USD and the Entry → SL distance.
- OPEN / WON / LOST — trade status. May be suffixed with
(Session End),(News),(Sideway),(Extreme), or(Reversed)when the position was force-closed by the corresponding filter or replaced by a same-bar opposite-direction setup. - ET — entry price.
- SL — stop-loss price (moved to entry / breakeven after TP1 is hit).
- TP1 — partial take-profit price.
- TP2 — final take-profit price.
A green ✅ is appended next to TP1 and/or TP2 once the corresponding level is touched on the chart.
Example — open Long trade:
L-E1 #0428-1430
Max Lot: 0.20
OPEN
ET:   3310.000
SL:   3304.000
TP1:  3314.800
TP2:  3319.000
After the trade closes with both TPs hit:
L-E1 #0428-1430
Max Lot: 0.20
WON
ET:   3310.000
SL:   3304.000
TP1:  3314.800 ✅
TP2:  3319.000 ✅
9.3 Trade Level Lines
For each active trade, four horizontal lines mark the key levels:
- Entry — solid line at the entry price.
- SL — red line at the stop loss. Moves to breakeven (entry) after TP1 hits.
- TP1 — green dashed line at the partial take-profit.
- TP2 — green solid line at the final take-profit.
Lines extend until the trade closes, then are finalized at the closing bar.
9.4 Daily & Weekly Summaries
At the end of each trading day (boundary = 08:30 JST, or 05:59 JST when “Ignore session time” is on), the bot draws a daily results label directly on the chart. The label uses trade counts and percentages — no pip totals:
📈 Daily Results [XAUUSD] of April 16, 2026
- Trades: 9 (Won 7 / Lost 2)
- Win rate: 77.78% · TP2 hit rate: 33.33%
- Hypothetical · not financial advice
At the end of Friday, a weekly results label is drawn for the full week (Mon → Fri) in the same format, stacked above the daily label. Both labels carry the - Hypothetical · not financial advice trailer so the on-chart counts cannot be misread as a live track record:
📈 Weekly Results [XAUUSD] of April 6~April 10, 2026
- Trades: 67 (Won 38 / Lost 29)
- Win rate: 56.72% · TP2 hit rate: 32.84%
- Hypothetical · not financial advice

📈 Daily Results [XAUUSD] of April 10, 2026
- Trades: 8 (Won 4 / Lost 4)
- Win rate: 50.00% · TP2 hit rate: 25.00%
- Hypothetical · not financial advice
The 📈 / 📉 emoji reflects whether the period’s net P&L (tracked internally) was positive or negative.
On-chart vs. alert. The Trades / Win-rate / TP2-hit-rate counts above live only on your private TradingView chart. The corresponding companion alert does not repeat them — it sends a neutral 📈/📉 Activity summary - XAUUSD line and points you back to the chart. This is intentional: the alert payload stays a passive log, while the detailed numbers stay where you can see them yourself.
9.5 Risk → Max Lot Size Examples (Alert Bonus)
Examples. Not financial advice.
When alerts are configured, every entry-setup log includes a Risk → Max Lot Size Examples table covering $10–$50 of risk, computed from that specific setup’s Entry → SL distance on the chart and labelled “not financial advice”. The numbers change with every setup because each setup has a different SL distance. They’re examples to make the math easy to picture — not a sizing recommendation, not advice. Choose your own per-trade risk based on your account, your tolerance, and your own decision.
📅10. Real Trading Day Examples
This section shows what the indicator actually looks like on live TradingView charts — across both favorable and unfavorable days. The goal is to set realistic expectations, not curate a highlights reel. Past performance does not guarantee future results.
10.1 A high win-rate day — Apr 16, 2026
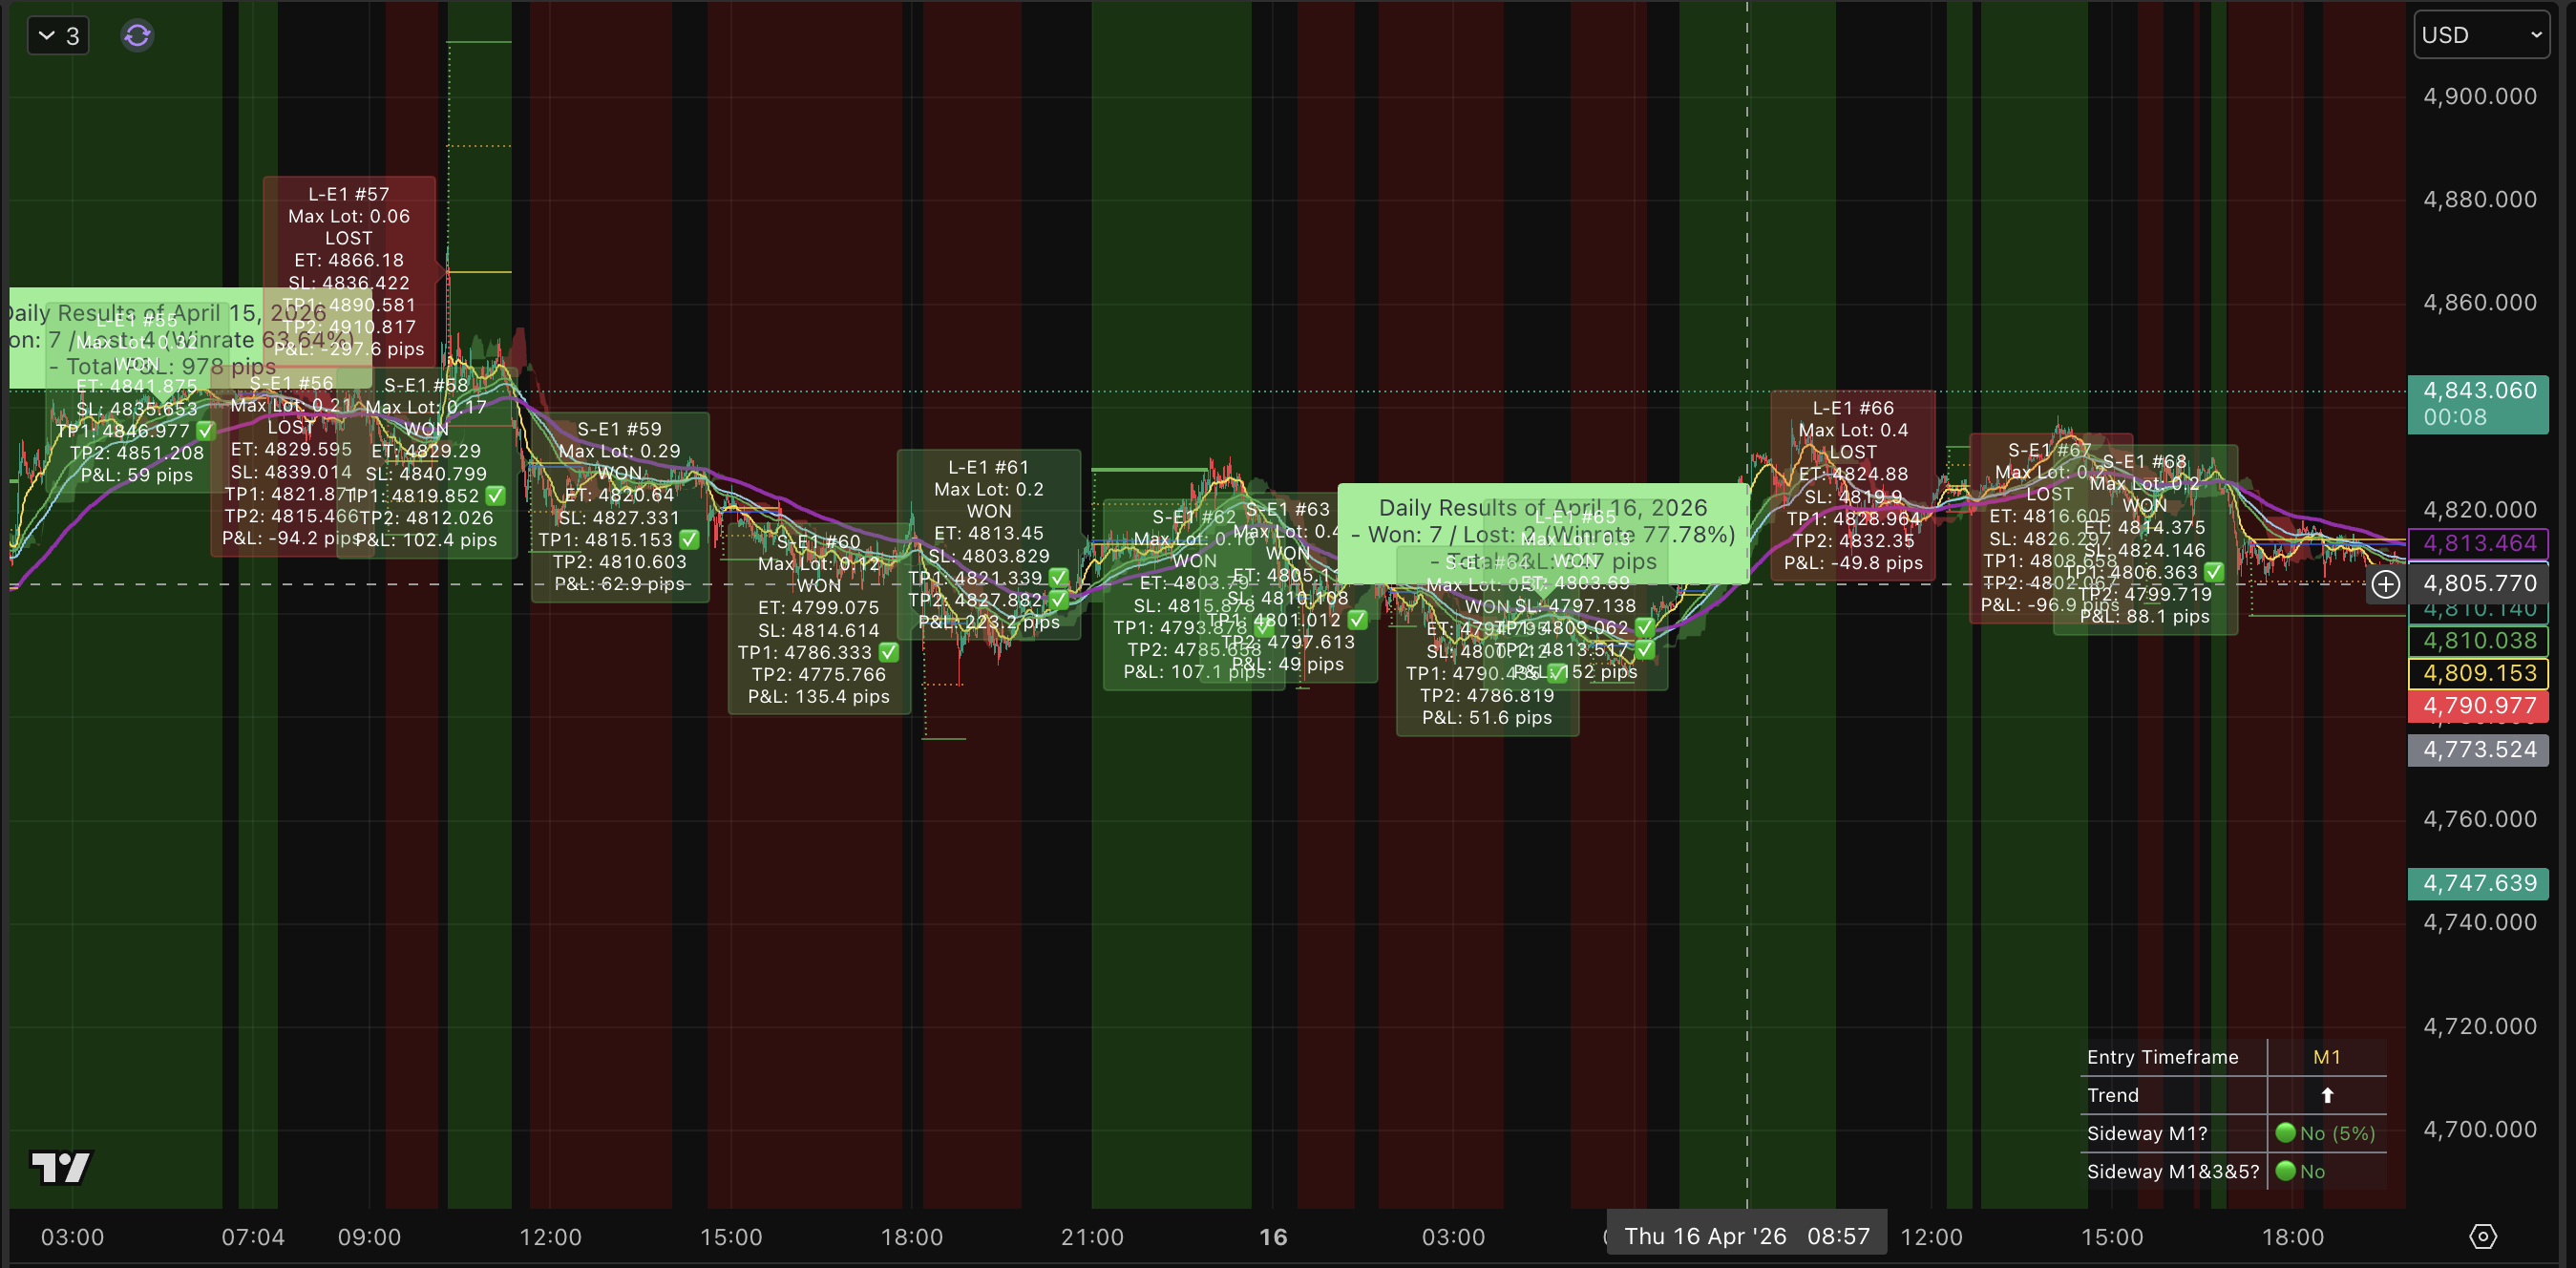
7 wins / 2 losses (~78% win rate) · +347 pips
A clean day by hit rate, but the pip total is modest because most trades closed at TP1 and the remainder returned to breakeven. This is the standard TP1/TP2 structure doing its job — protecting capital on days when the second leg doesn’t materialize.
10.2 A strong trending day — Apr 2, 2026
7 wins / 3 losses (70% win rate) · +2,648 pips
A session with sustained directional movement. More trades reached TP2 instead of closing at breakeven — which is why the pip total is dramatically larger despite a lower win rate than Apr 16. A handful of full winners greatly outweigh many partial wins.
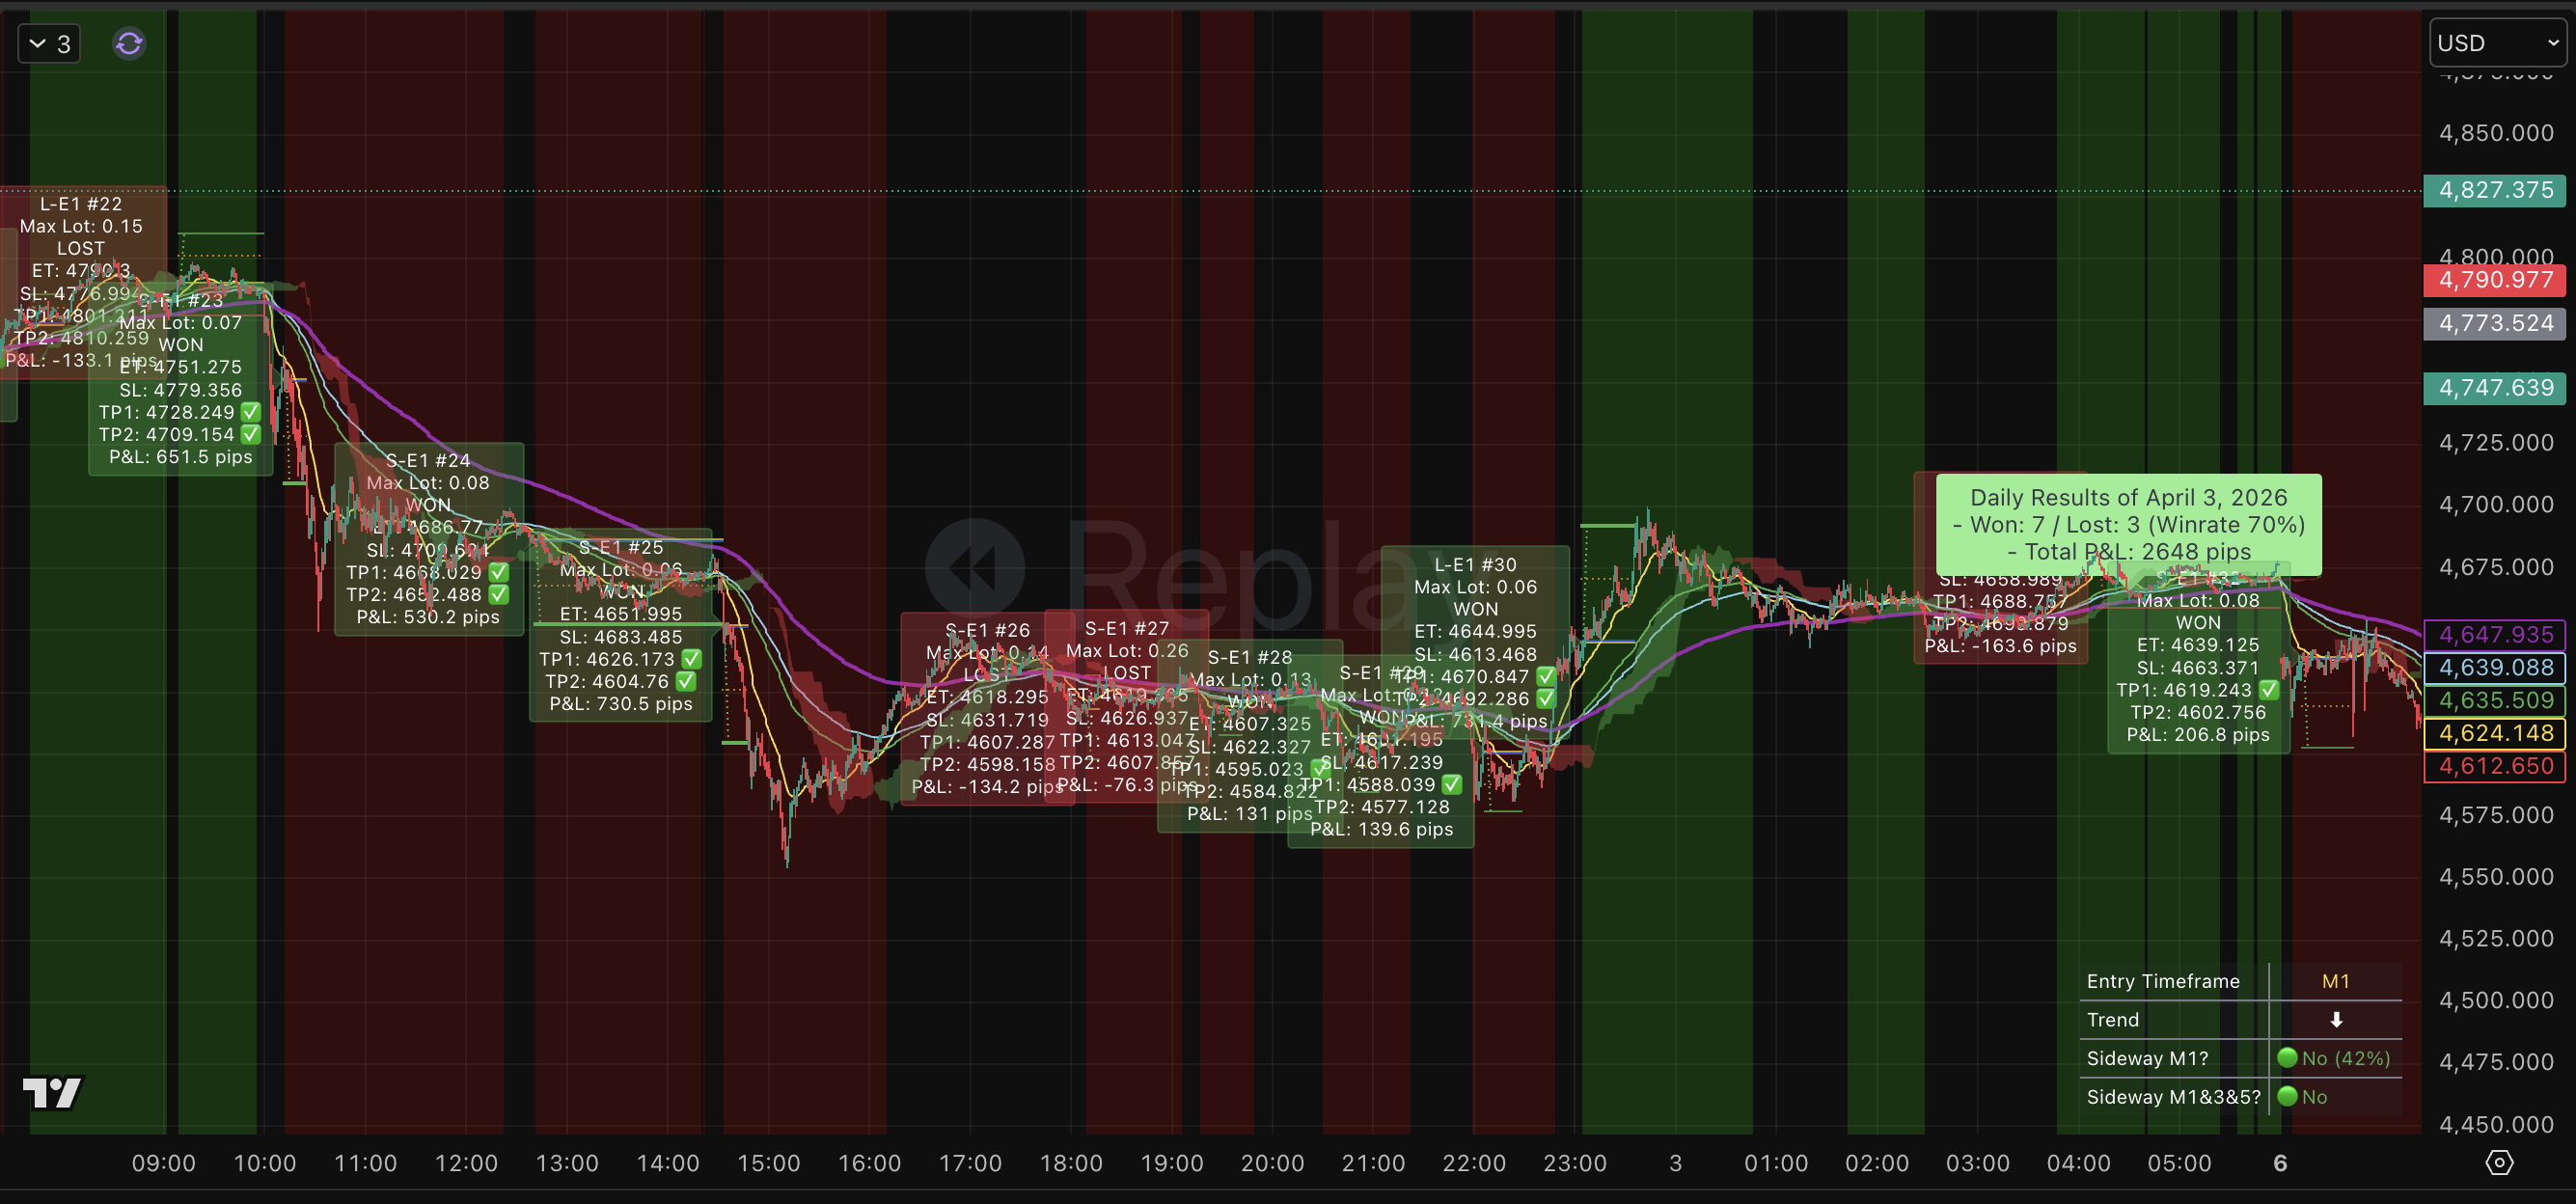
10.3 A losing day — Apr 3, 2026
2 wins / 3 losses (40% win rate) · −458 pips
A textbook choppy/sideways session. The sideways filter reduces losses but it can’t eliminate every false setup. Losing days are part of the job. The system is designed to absorb them and let the trending days carry the statistical average over time.
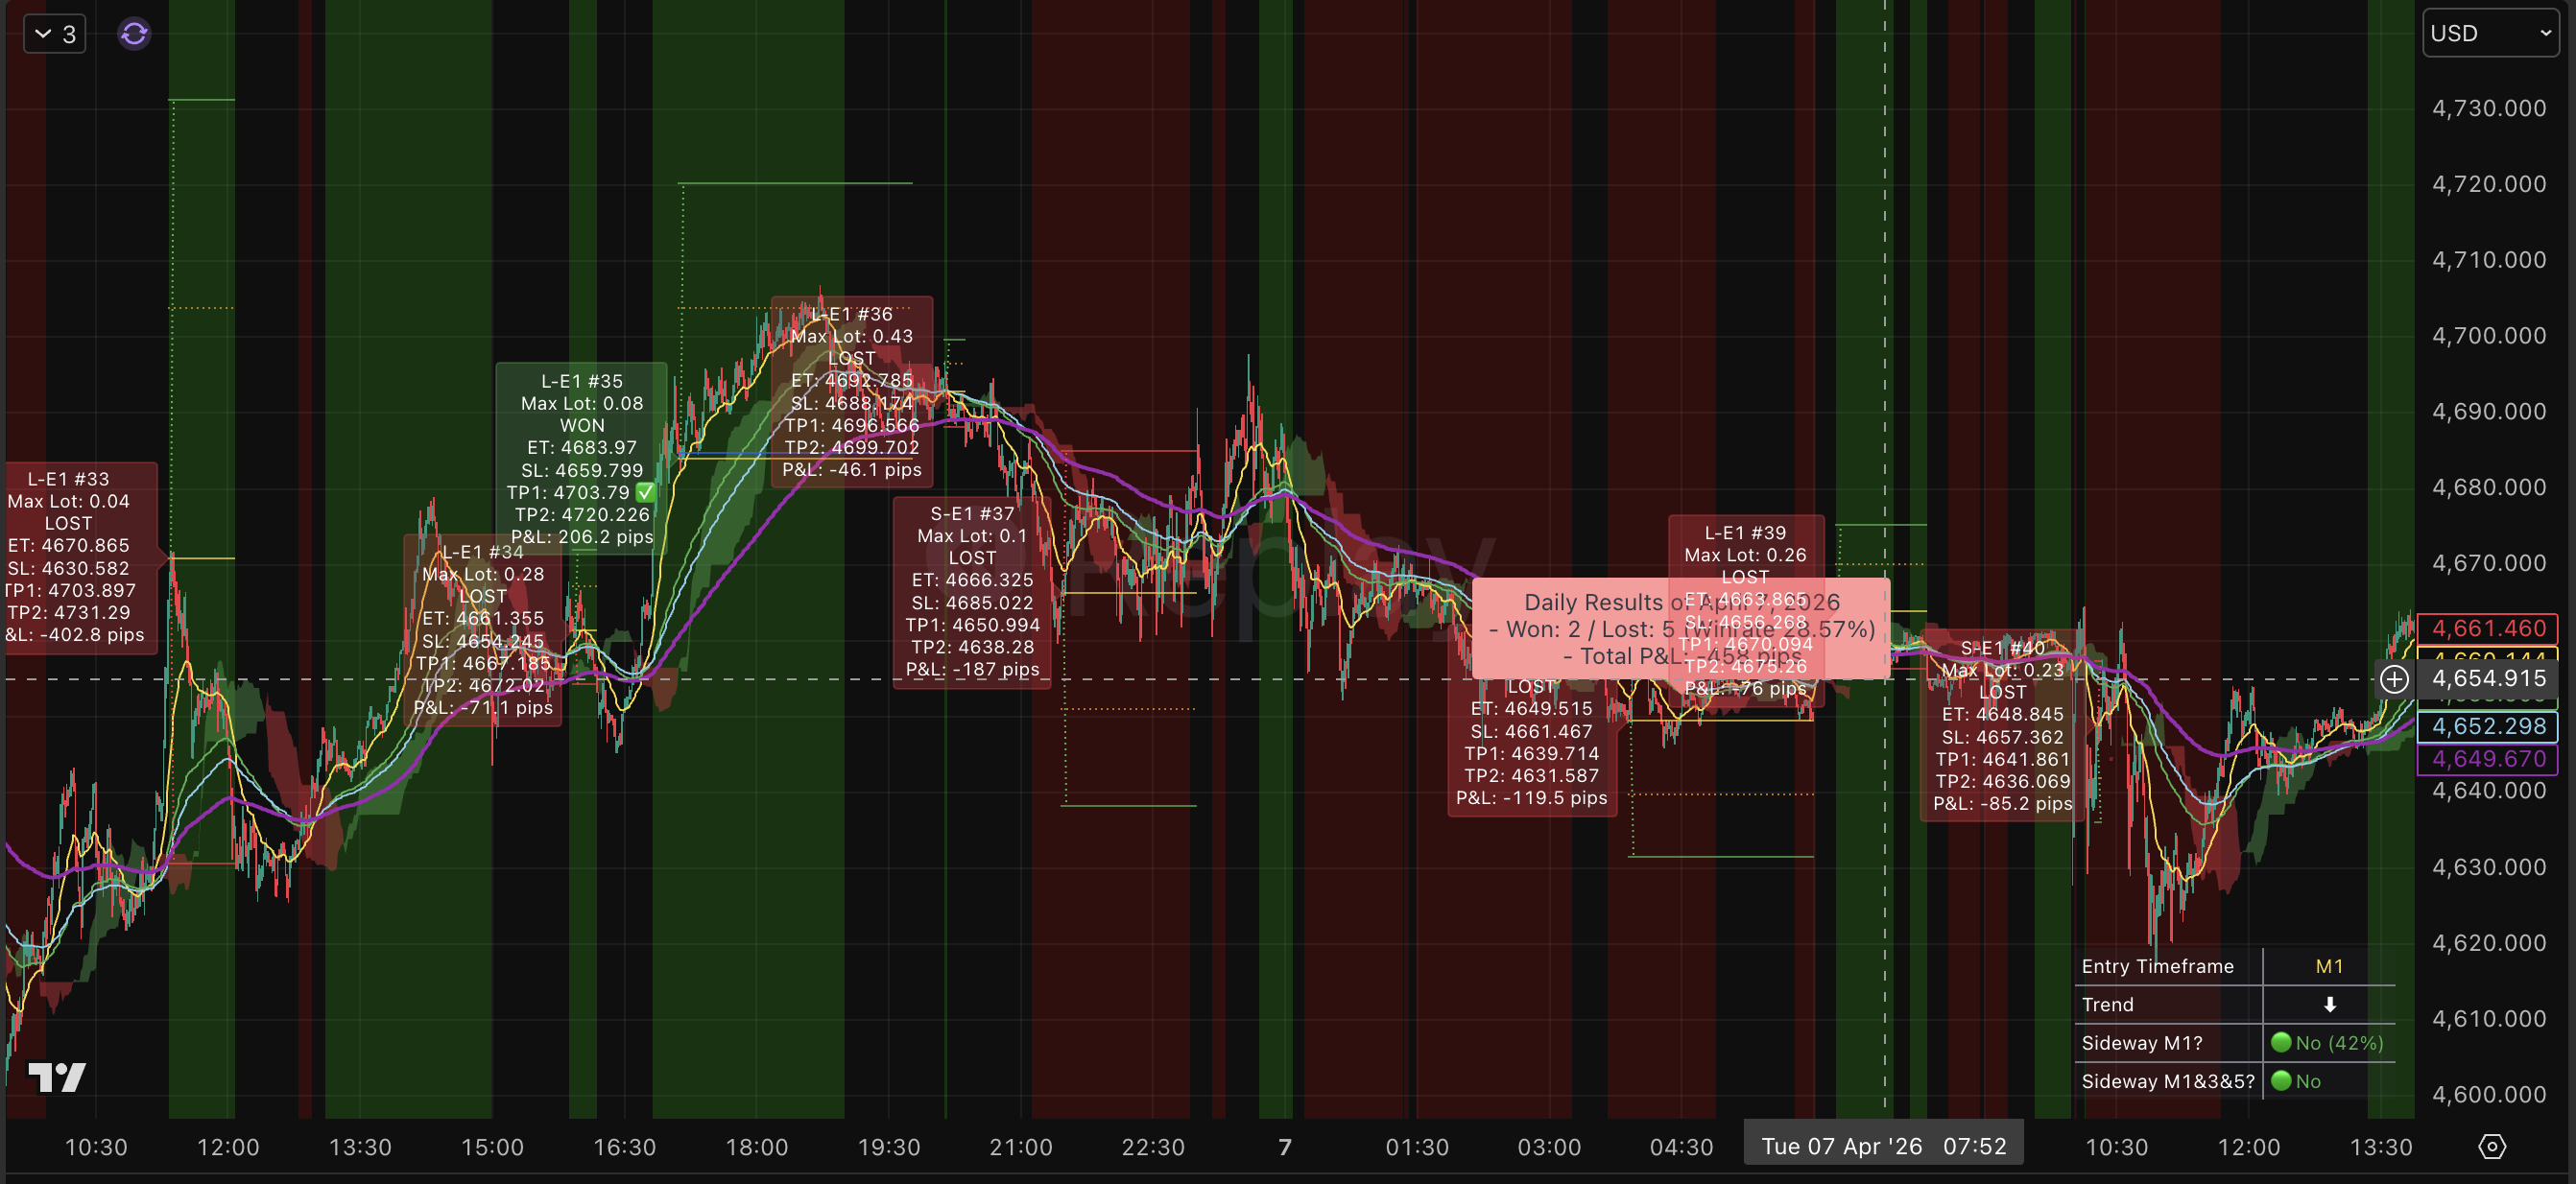
10.4 An instructive day — Apr 8, 2026
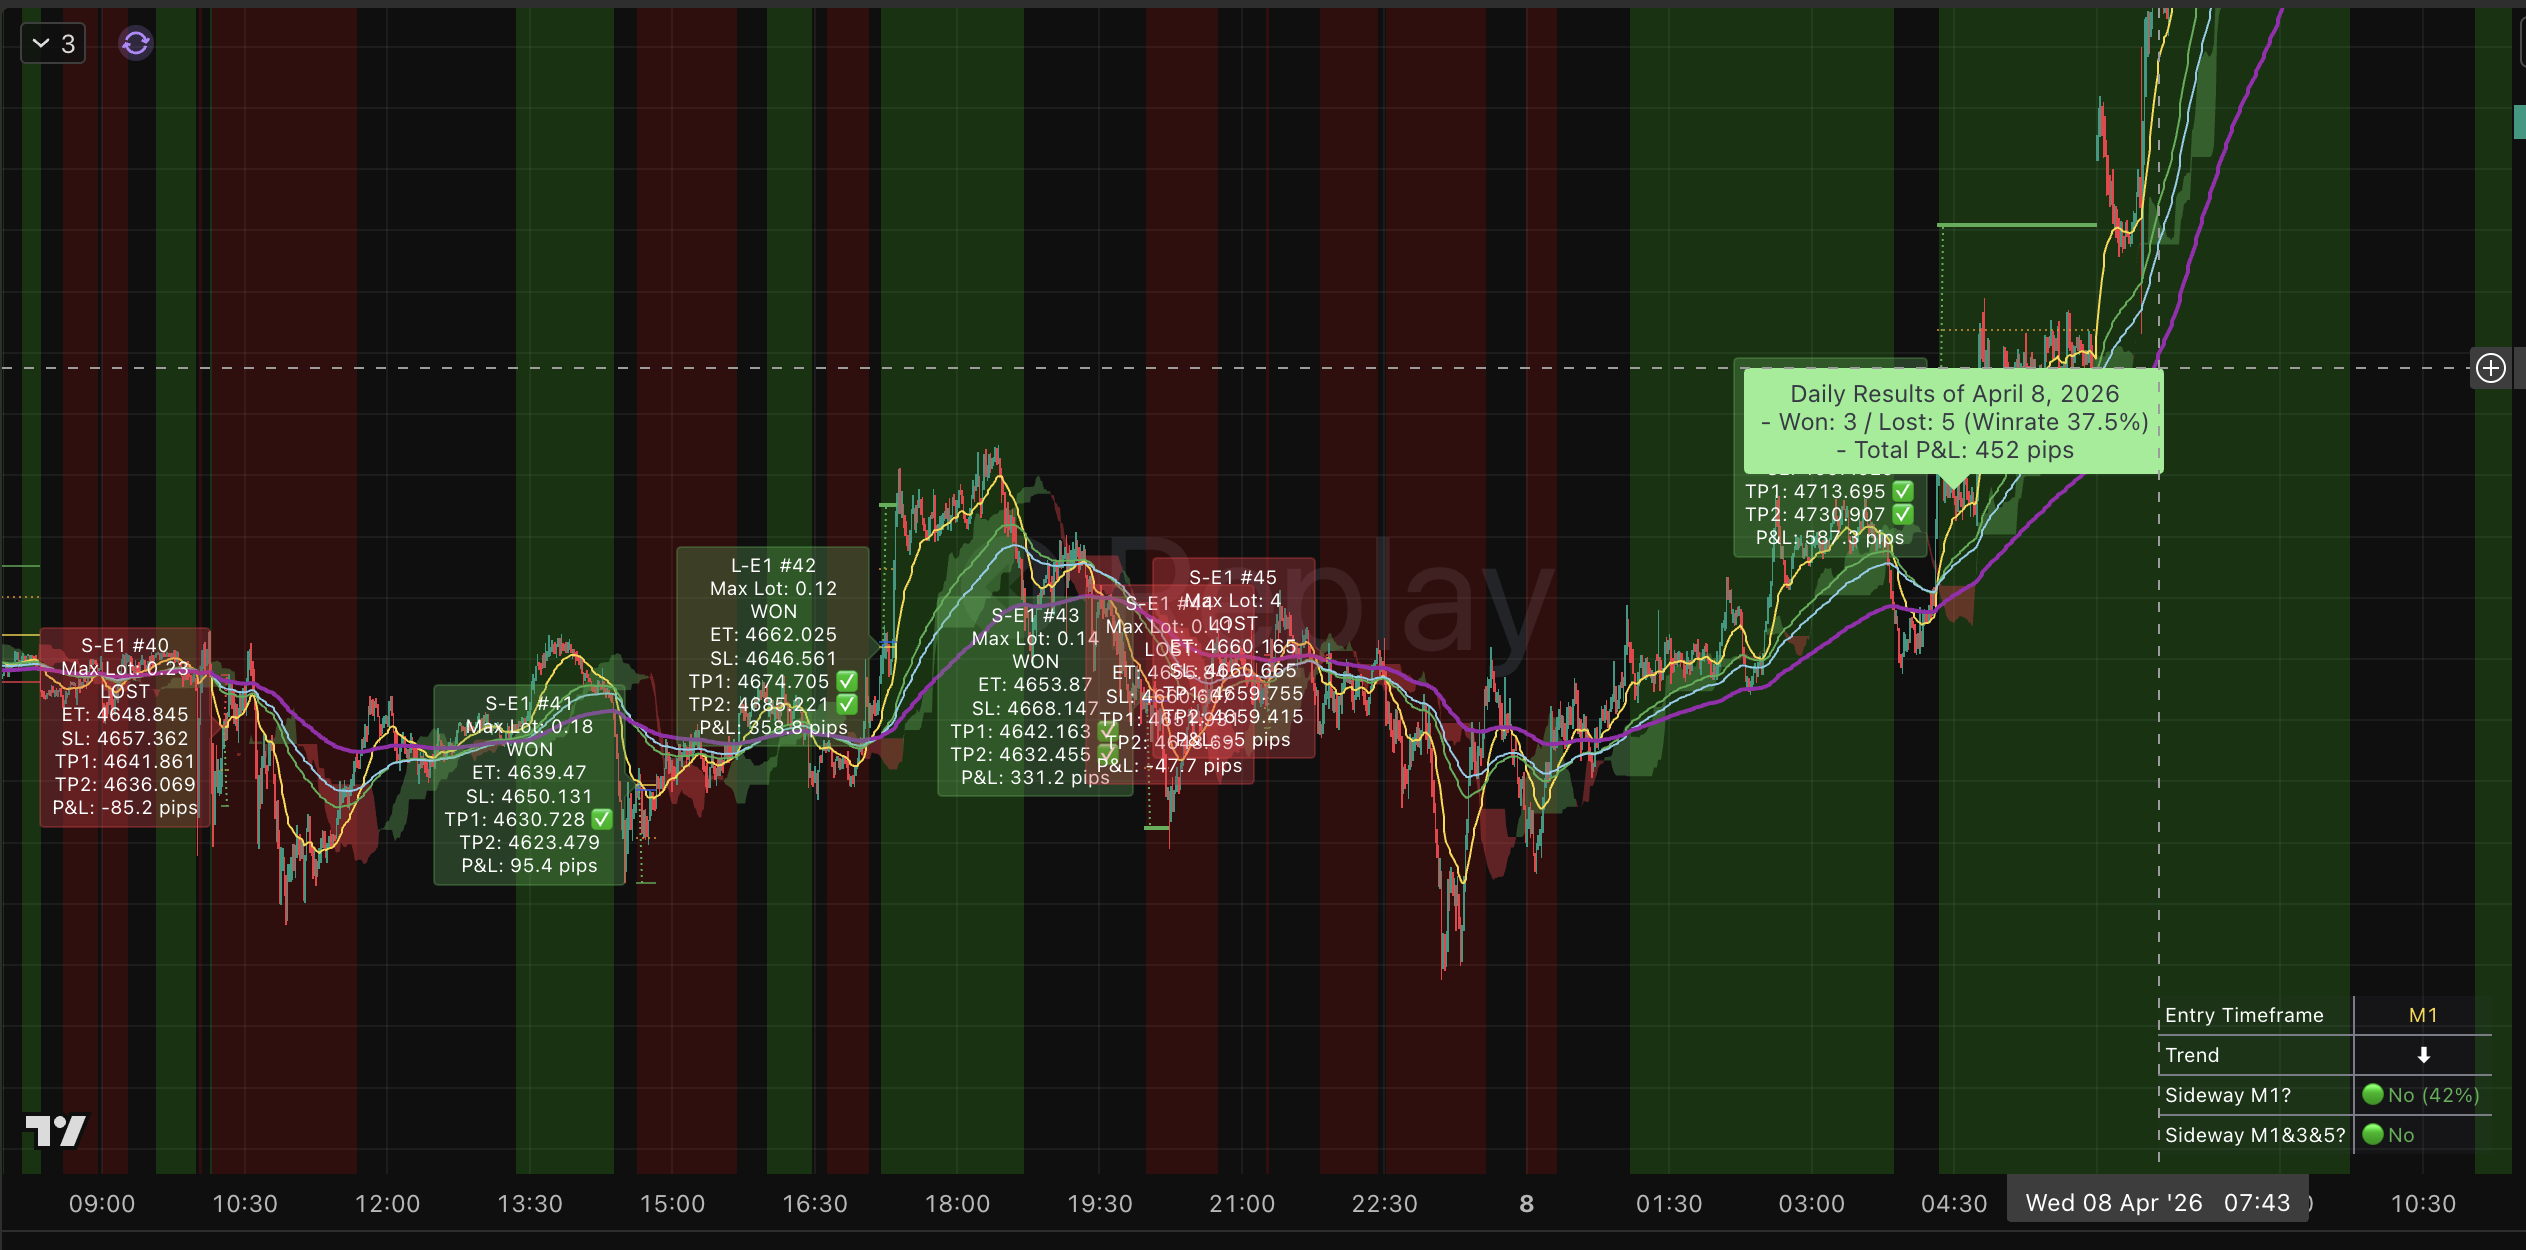
3 wins / 5 losses (37.5% win rate) · +452 pips
Only 37.5% win rate, yet the day finished comfortably positive. A strong trend leg appeared late in the session — winners pushed all the way to TP2, far outweighing the smaller losses. Early exits on sideways conditions also kept the losing trades small.
Key lesson: win rate is not everything — expectancy is. A low win rate combined with an asymmetric R:R structure (large TP2 wins vs. small breakeven losses) still produces positive expectancy.
10.5 Weekly summary — Apr 6–11, 2026
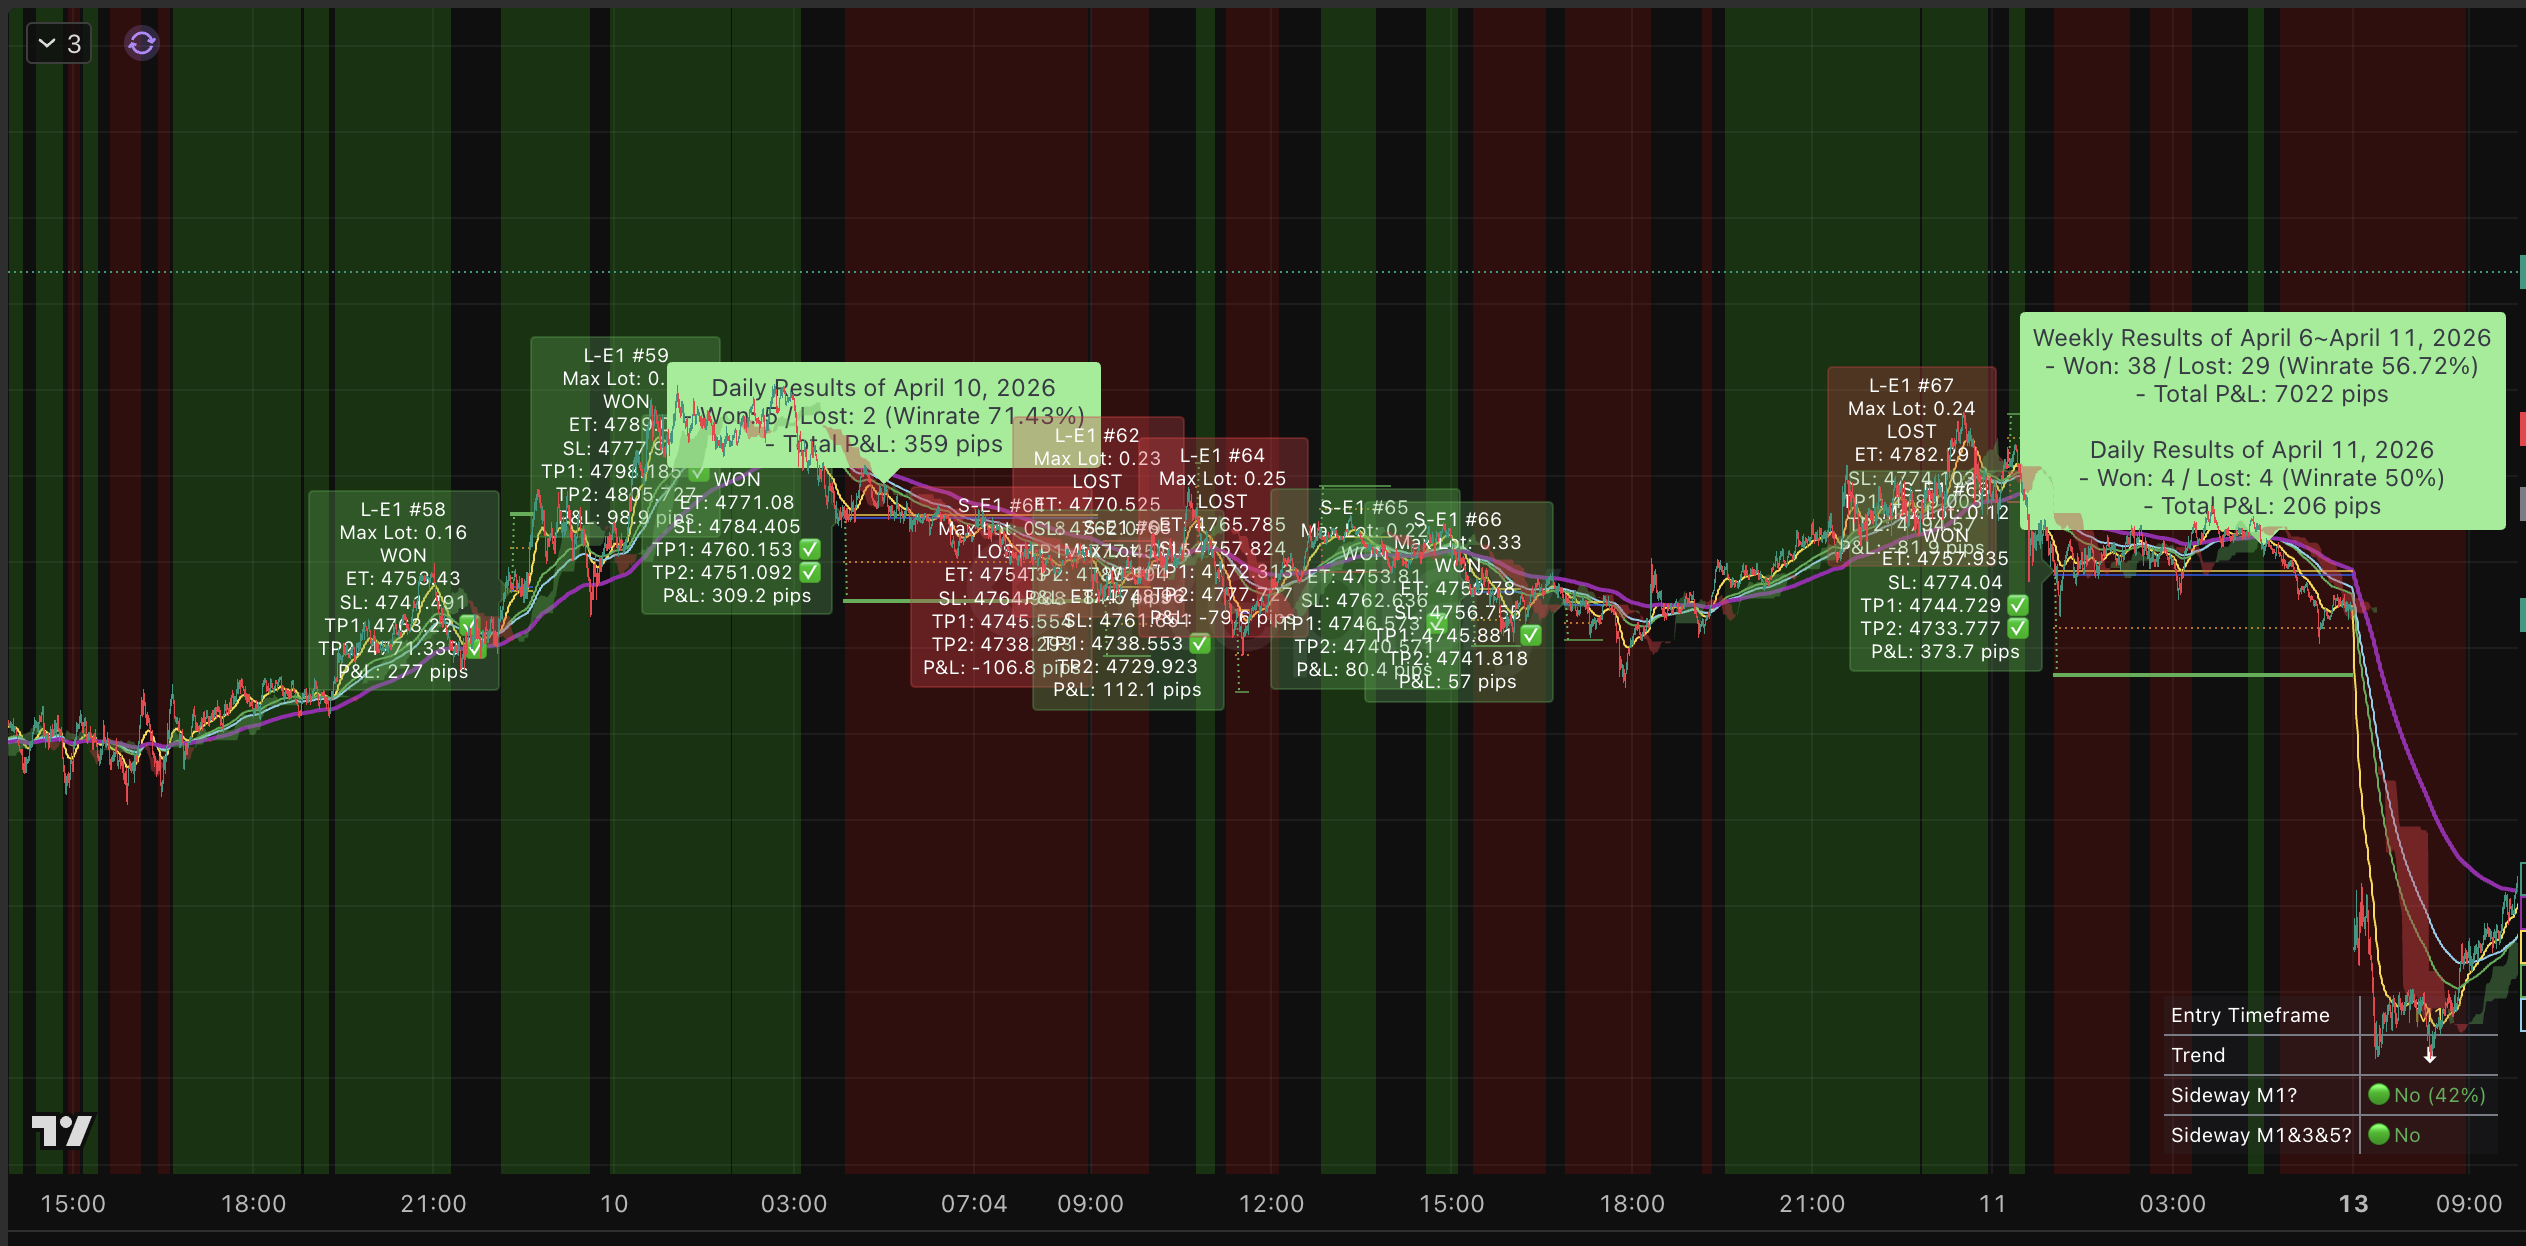
38 wins / 29 losses (56.72% win rate) · +7,022 pips for the week
Apr 11 in isolation was a 50% break-even-by-trade-count day that still ended +206 pips because the TP1/TP2 structure awards more pips to winners than it costs on losers.
All numbers above are historical examples drawn directly from the chart. Past performance does not guarantee future results. Your actual outcomes will depend on your configuration, your broker’s spread/commission, and live market conditions.
🧪11. Backtest Reference — How the Engine Performs in Development Testing
The backtest figures below are for reference only. They show how the internal strategy engine — the same engine the published indicator is built on — performs under realistic cost assumptions (commission + slippage). These tests are run during development to validate entry quality and risk management before each release.
Your actual results will differ depending on:
- How you configure the input parameters (session times, risk amount, R:R ratio, sideway handling, etc.)
- Your broker’s spread, slippage, and commission profile
- Prevailing market conditions during the period you trade
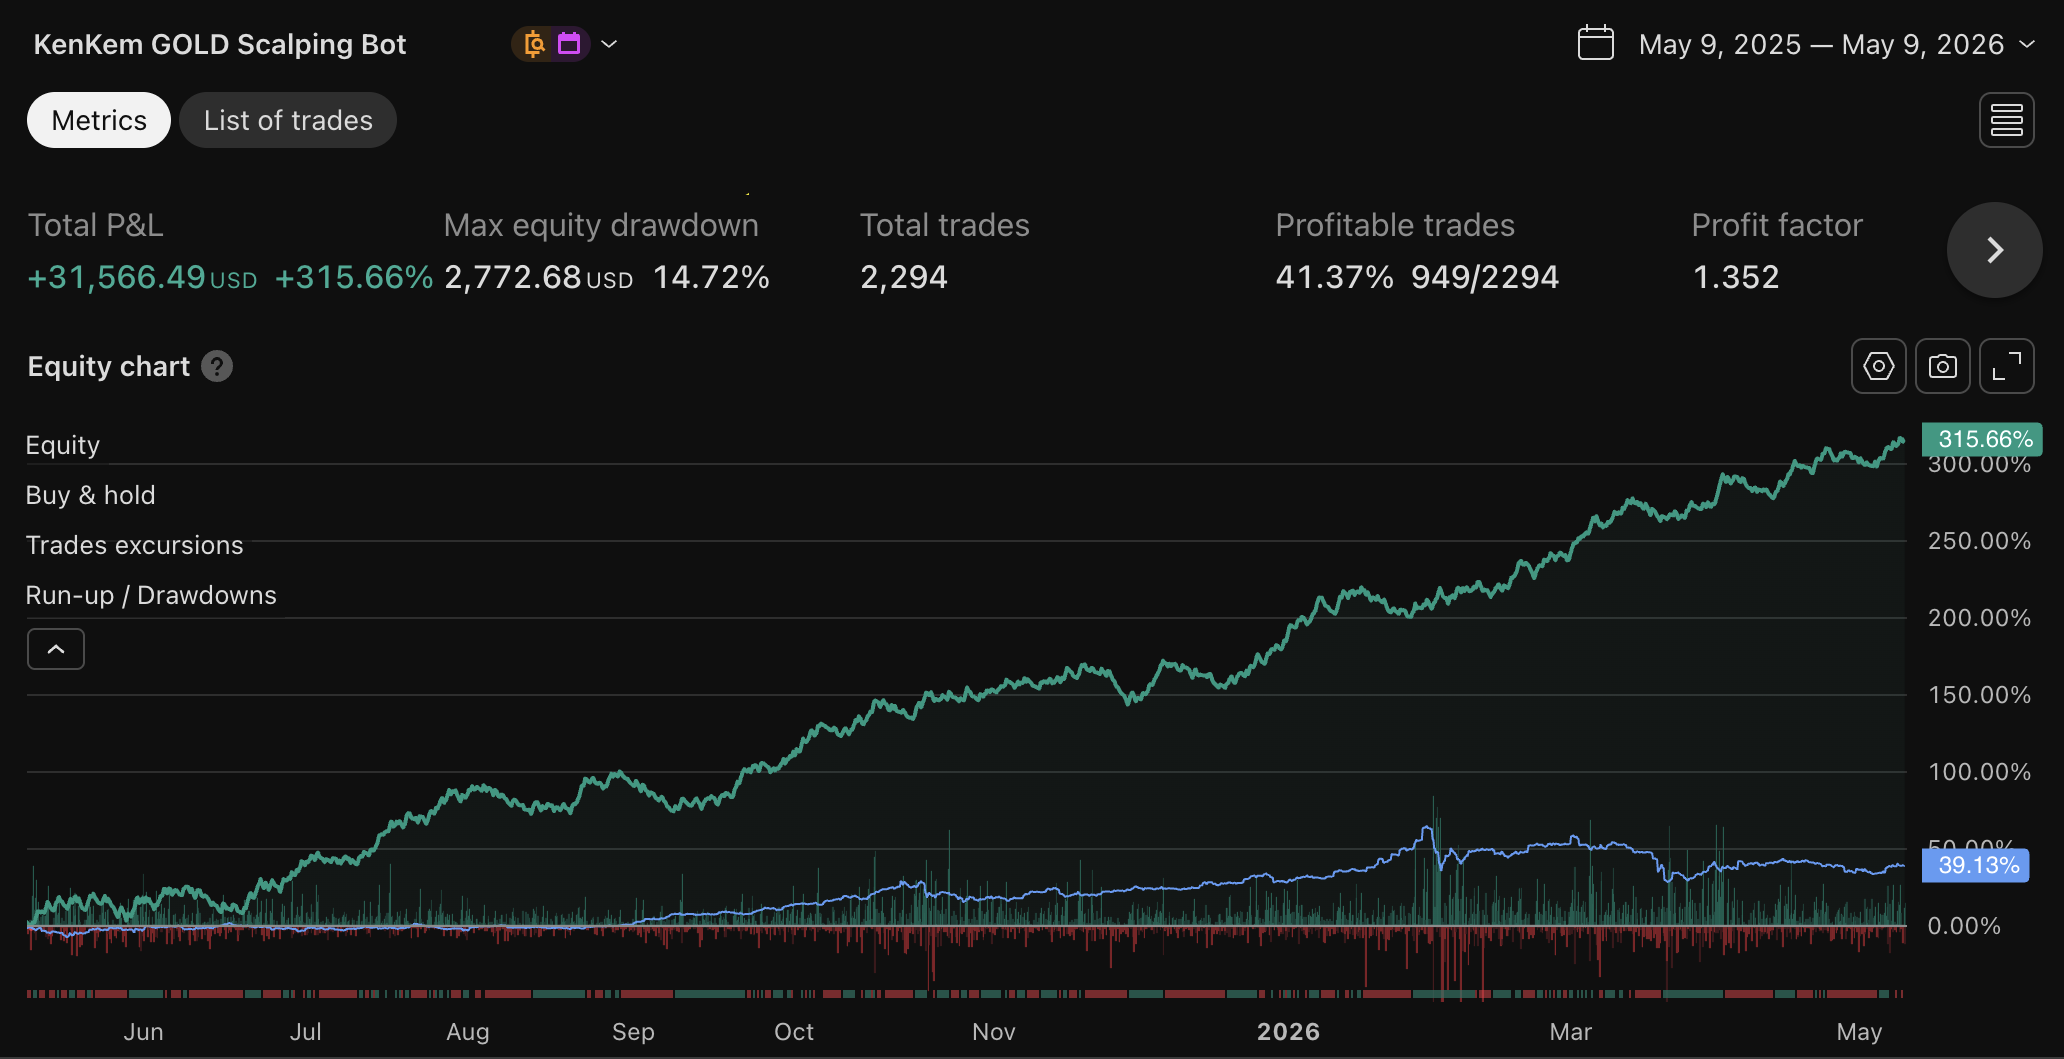
11.1 One Year (May 9, 2025 – May 9, 2026)
| Metric | Value |
|---|---|
| Total P&L | +31,566.49 USD (+315.66%) |
| Max Equity Drawdown | 2,772.68 USD (14.72%) |
| Total Trades | 2,294 |
| Profitable Trades | 41.37% (949/2,294) |
| Profit Factor | 1.352 |
11.2 MT5 Expert Advisor — Real-Tick Backtest
The KenKem MT5 Expert Advisor — autonomous execution of the same engine inside MetaTrader 5 — is available on the MQL5 Market. The figures below come from a real-tick backtest on Exness data, full broker-side conditions, over a nine-month window. They describe backtest output, not a live track record.
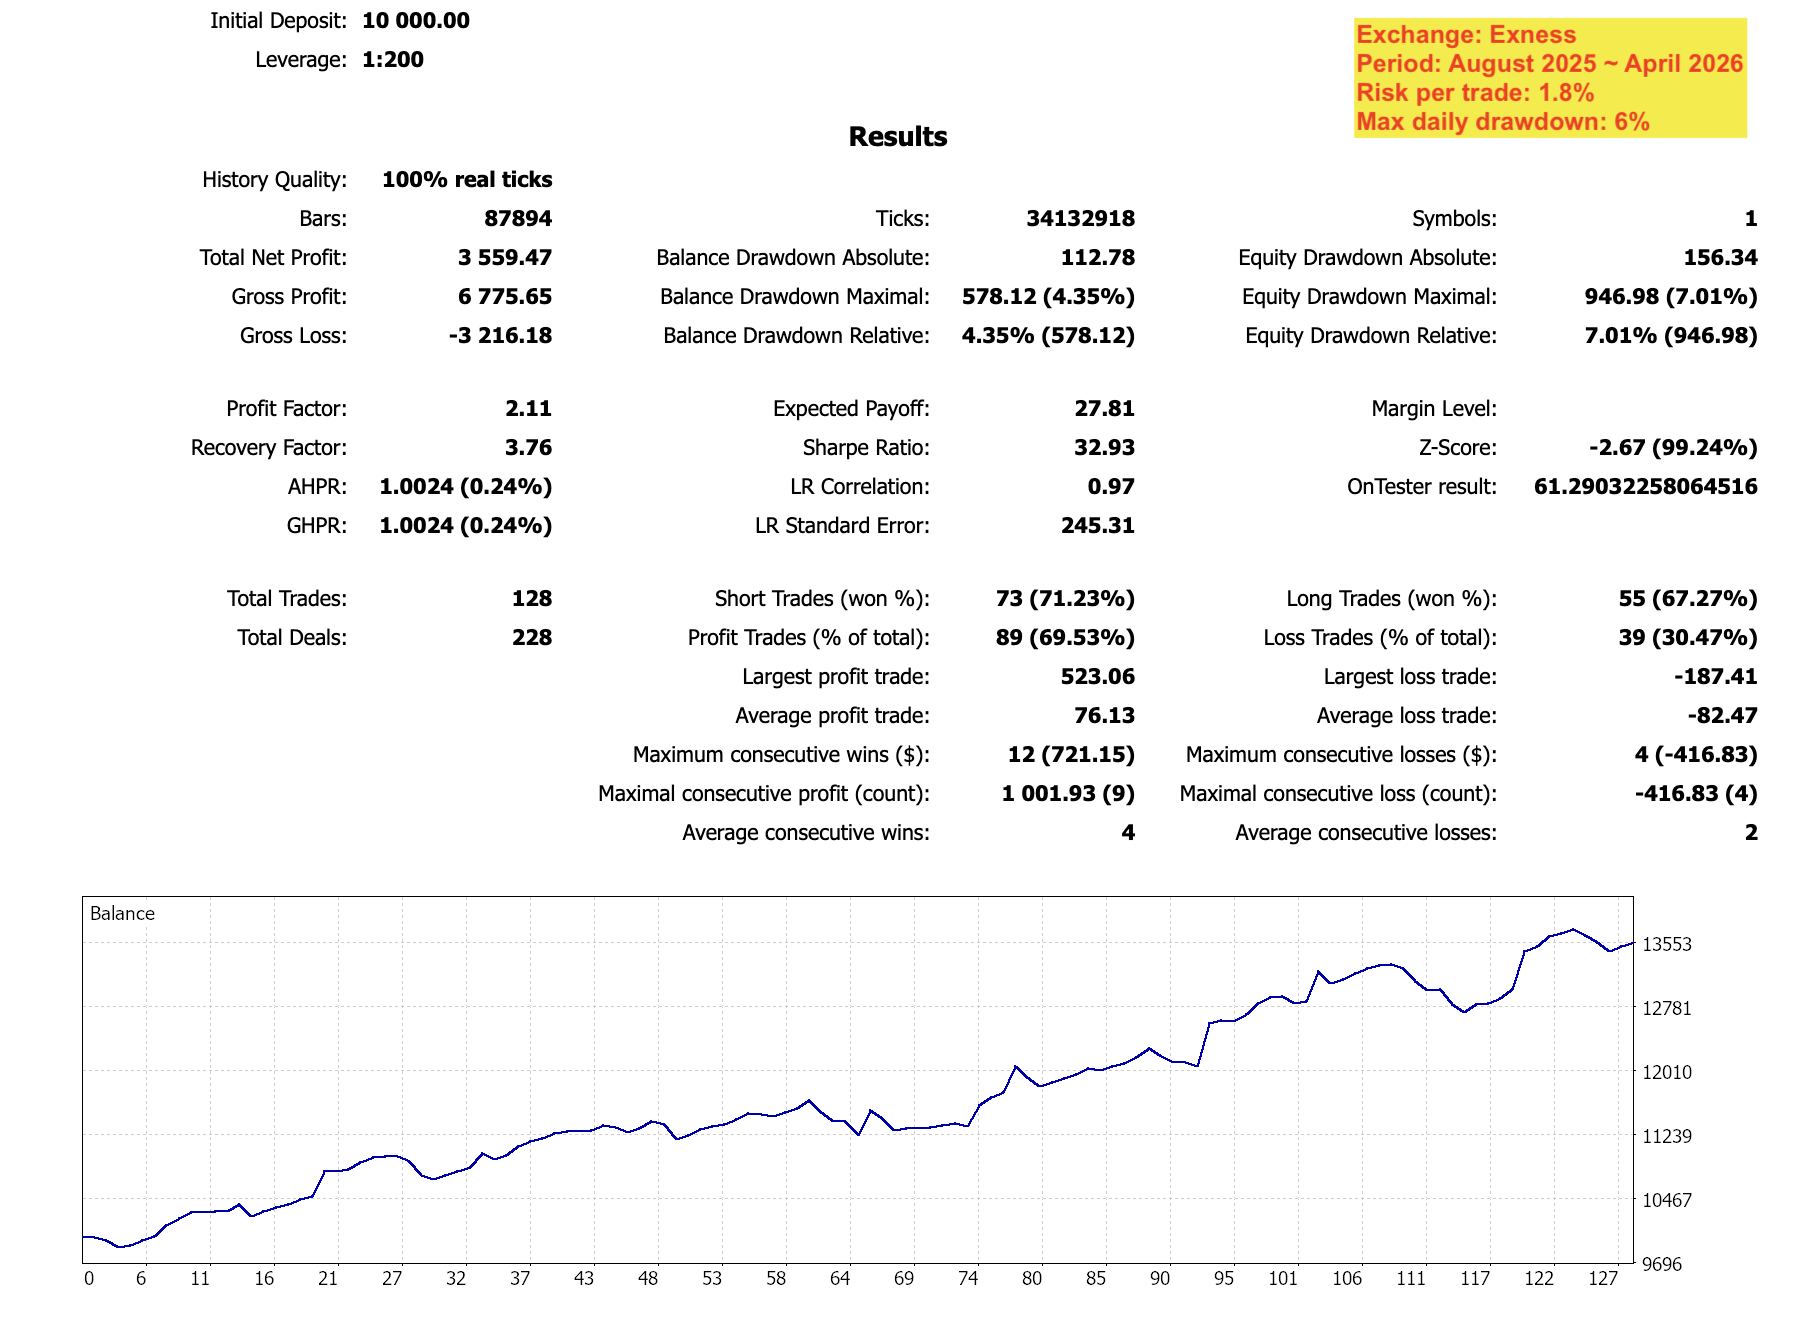
Test conditions
- Broker: Exness
- Tick data: 100% real ticks · 34,132,918 ticks across 87,894 M1 bars
- Period: August 2025 – April 2026 (~9 months)
- Symbol: XAUUSD only
- Initial deposit: $10,000 USD
- Leverage: 1:200
- Risk per trade: 1.8%
- Max daily drawdown cap: 6%
Headline metrics
| Metric | Value |
|---|---|
| Total Net Profit | +3,559.47 USD (+35.59%) |
| Profit Factor | 2.11 |
| Recovery Factor | 3.76 |
| Sharpe Ratio | 32.93 |
| Expected Payoff | 27.81 USD / trade |
| Total Trades | 128 (228 deals) |
| Win Rate | 69.53% (89 / 128) |
| Avg. Win / Avg. Loss | +76.13 / −82.47 USD |
| Largest Win / Largest Loss | +523.06 / −187.41 USD |
| Max consecutive wins / losses | 12 / 4 |
| Balance Drawdown (max) | 578.12 USD (4.35%) |
| Equity Drawdown (max) | 946.98 USD (7.01%) |
| LR Correlation | 0.97 |
What the curve actually shows
- PF 2.11 under broker-realistic conditions. Higher than the indicator’s one-year PF of 1.352 because the EA executes at tick resolution and removes the human latency that drags any manual workflow. We do not expect every quarter to print the same number.
- Equity drawdown peaks at 7.01%. That sits inside the 6% daily-drawdown cap when measured at the daily horizon — the cap is what keeps a bad day from becoming a bad month.
- 69.5% win rate across 128 trades, average winner +$76.13 vs. average loser −$82.47. The edge is not “always right” — it’s being right often enough while the TP1/TP2 structure does the heavy lifting on expectancy.
- Recovery Factor 3.76 — for every dollar of max drawdown the system recovered roughly $3.76 of net profit over the period.
- LR correlation 0.97. The equity curve sits tight against its linear regression, i.e. growth was steady rather than concentrated in a single lucky leg.
This is a backtest, not a track record. Live results will differ — broker spread profile, execution latency, swap, news-event slippage, and the simple fact that nine months is not twelve all matter. We will publish live monitoring as a track record builds.
Disclaimer. Past performance — including real-tick backtests under broker-realistic conditions — does not guarantee future results. The figures above represent backtest output, not a live track record. The EA runs on your own MT5 terminal at your own broker; KenKem does not execute trades, does not custody funds, and does not provide investment advice. Trade only with capital you can afford to lose.
11.3 What These Numbers Tell You
- Profit Factor > 1.0 means the system made more than it lost over the test period. Margins in scalping are always thin — PF 1.35 is realistic for a high-frequency XAUUSD scalper trading manually under cost-realistic conditions, and PF 2.11 is what tick-perfect EA execution can add on top.
- Win rate is intentionally sub-50%. The indicator’s one-year win rate is 41.37% — i.e. the engine is wrong slightly more often than it is right. Positive expectancy comes from the asymmetric TP1/TP2 structure (winners are large enough to outweigh losers), not from an inflated win rate. The EA backtest sits higher (~70%) because tick-perfect execution captures setups manual trading would miss, but the same principle applies: do not pick this tool because you expect to be right most of the time.
- Drawdown is real. The 1-year indicator test shows ~15% max equity drawdown; the 9-month EA backtest shows ~7%. The equity curve is not linear: expect losing streaks, flat periods, and recovery phases. If you can’t tolerate the relevant drawdown for your edition, reduce per-trade risk.
- Months will go sideways. Visible flat-to-slightly-down stretches appear in the one-year equity curve before strong recovery phases during trending markets — sideways months are part of the system, not an anomaly.
11.4 Our Development Process
Before every release we run multi-month backtests with realistic spread, slippage, and commission to verify entry quality holds under stress. We don’t optimize for the best-looking equity curve — we optimize for survivability: a consistent edge with manageable drawdown across different market regimes (trending, ranging, news-driven volatility).
We work hard to ship a stable, well-tested indicator. We do not and cannot guarantee outcomes.
Disclaimer: The published indicator is not a strategy — it does not execute trades or include a TradingView Strategy Tester. The backtest results above come from an internal development engine used solely for quality assurance. Past performance — whether live, simulated, or backtested — does not guarantee future results. Market conditions change continuously, user configurations vary, and no trading tool eliminates the risk of loss. Trade only with capital you can afford to lose.
✅12. Quick-Start Checklist
Run through this list before your first session.
Chart setup
- Chart is XAUUSD on OANDA, M1 timeframe
- No red “Wrong TF” warning overlay visible
- No gray out-of-session overlay during your intended trading hours
Inputs tab
- Max Risk Per Trade matches your real risk tolerance
- Risk:Reward Ratio matches your style (Premium only — Free ships with the locked default)
- Session times match your intended trading hours
- Force Close at Session End is configured as desired (default OFF)
- Sideways handling mode is set (0 = off, 1 = exit, 2 = tighten SL)
Alerts
- Alert created with condition set to your KenKem GOLD Scalping Bot indicator instance
- Trigger set to “alert() function calls only”
- Delivery method configured (app, email, webhook, or all)
- Alert is active and not expired
⚠️13. Common Mistakes
The five mistakes we see most often — avoid all of them.
| Mistake | Consequence |
|---|---|
| Chart TF does not match M1 | Red overlay appears; the bot emits no trades (by design). |
| Alert trigger not set to “alert() function calls only” | You receive TradingView’s generic crossing alerts instead of the indicator’s bot-log companion lines. |
| Alert expired without noticing | No notifications fire — check alert status regularly. |
| Max Risk set too high for account size | Reference lot sizes will be dangerously large. Risk only what you can afford to lose. |
| Ignoring session filter (24/5 mode) | Low-liquidity hours produce unreliable entries and wider spreads. |
📋14. Example Configuration — XAUUSD
A solid, conservative starting point for XAUUSD on M1. Tune over time to match your style, then iterate from there.
| Field | Value |
|---|---|
| Max Risk Per Trade | 100 USD |
| Risk:Reward Ratio | Locked default (Premium only — Free is locked at this value) |
| Sessions | Default (900–1500 / 1600–2000 / 2130–2530 JST) |
| Force Close at Session End | OFF (default) |
| News Avoidance | ON · 15 min before / 15 min after |
| Sideways handling for open trades | 0 (Off) |
| Extreme Momentum Exit | ON |
| Volatility-Based R:R multipliers (Premium only) | All 1.00 (= flat). Tune one cell at a time. |
| Smart Trailing Stop (Premium only) | ON · Pre-TP1 Profit Ratchet ON · Trigger 0.3 ×R · Post-TP1 Trail Style “Tight” |
| Min Trend Quality Score (Premium only) | 5 |
| Alert trigger | alert() function calls only |
| Alert delivery | App notification + Discord webhook |
🤝15. Closing Words
The bot does not replace your discipline, and it does not eliminate risk. XAUUSD remains one of the most volatile instruments on the planet, and news or geopolitical surprises can produce price spikes that push traders into decisions outside their plan.
What KenKem GOLD Scalping Bot does is reduce the volume of emotional decisions you have to make: it spells out Entry/SL/TP, pre-computes lot sizes, records outcomes on the chart, and flags when market conditions look unfavorable. The rest — entering with discipline, staying calm through losses, and respecting the risk you set for yourself — still belongs to you.
Risk Disclaimer. Trading financial instruments, especially leveraged products like XAUUSD, carries substantial risk and may not be suitable for all investors. You could lose some or all of your invested capital. Past performance shown in this guide — whether live examples, backtest results, or hypothetical illustrations — does not guarantee future results. The authors of this indicator are not financial advisors and nothing in this guide constitutes financial advice. Always trade with capital you can afford to lose, and consult a qualified financial professional if in doubt.
Looking forward to seeing you in the KEM community.
For support and access, visit kenkem.biz.
KenKem GOLD Scalping Bot — by Ken + Kem