
MasterVP 2/10: the four setups. Breakout beyond value, reversion back to mPOC
· #mastervp #volume-profile #breakout-trading
My method takes exactly four kinds of trade on gold. Two of them carry almost the entire result, and I think the reason why is more useful than the setups themselves.
MasterVP · Systematic Trading Journey
Part 6 of 15: From discretionary to systematic
In the last chapter I described the map: the master value area, its edges mVAH and mVAL, and the master point of control, mPOC. This chapter puts trades on it.
The one question
On every closed bar, MasterVP asks one question: is price leaving value with enough evidence to follow, or only stretching into a low-quality move?
Everything below is an answer to that question. Note what is not in it. No chart patterns, no candlestick names, no price-action story about flags or wedges. Just value, and whether price is leaving it or coming back to it.
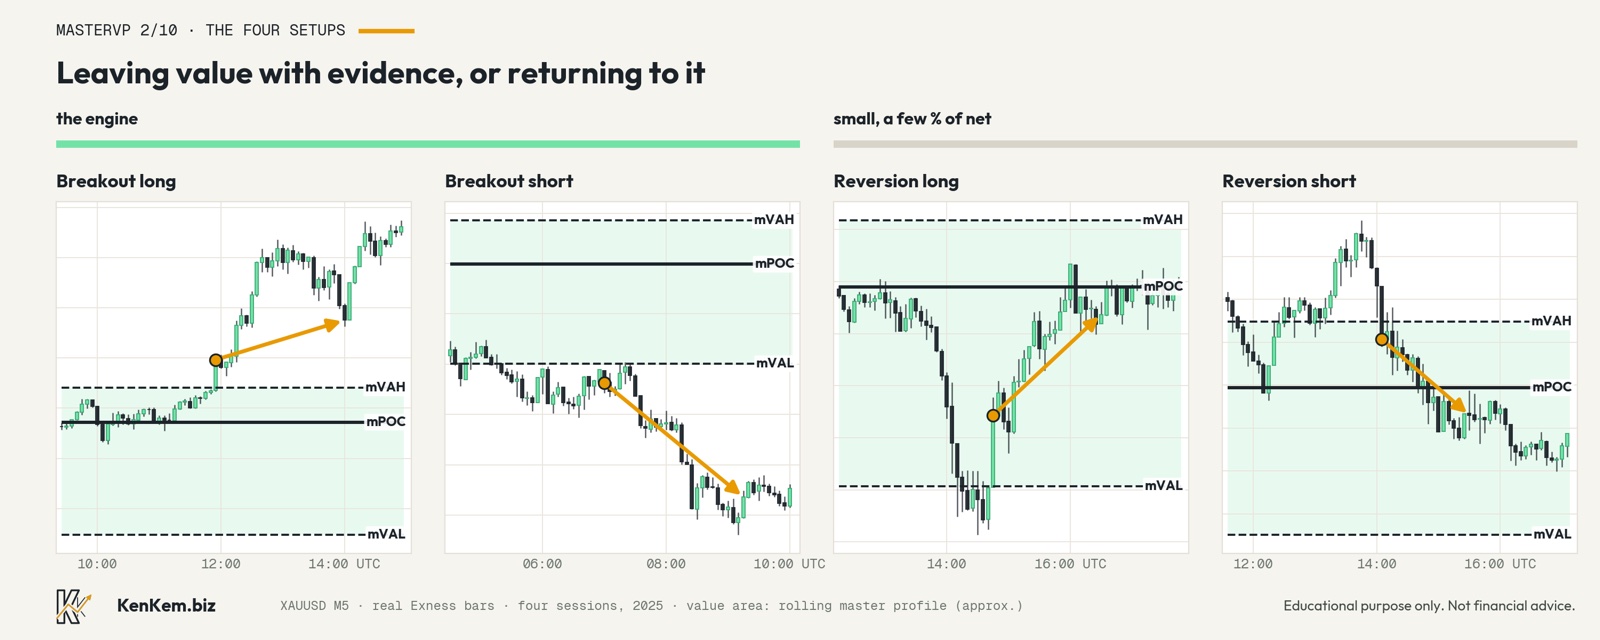
Setup 1: breakout long beyond mVAH
Price closes beyond the top edge of master value, clearly beyond it, with momentum and with enough activity behind the move to suggest acceptance rather than a poke. The trade goes with it.
Setup 2: breakout short beyond mVAL
The mirror image. Price closes clearly below the bottom edge of master value and the evidence says the market is accepting lower prices.
For both breakouts the entry is only beyond the edge, never inside value anticipating the break. Anticipation is a discretionary habit and, in my own testing, an expensive one.
Setup 3: reversion long, mVAL back to mPOC
Price pushes below value and gets rejected: it cannot build activity out there and is pulled back inside. The trade goes long from the mVAL side, and the natural destination is the master point of control, where most of the business got done.
Setup 4: reversion short, mVAH back to mPOC
Same idea from above. Price pokes above value, fails to be accepted, and rotates back toward mPOC.
The stop on a reversion sits a fraction of an ATR beyond the edge it is fading. If price is accepted out there after all, the idea was wrong and the trade should be small and quick to die.
What a breakout needs before it counts
A breakout is not a candle that crossed a line. Three things have to line up: a break out of the value area with momentum, enough structure behind it, and enough runway after costs to the next obstacle.
That last one is easy to skip and expensive to forget. If the next shelf of heavy activity sits close above the entry, a breakout long has nowhere to go before it runs into a wall of old agreement. A trade that cannot clear its own costs before the next obstacle is not worth taking, however clean it looks.
Confirmation in my system leans on flow, not pictures: the tick-activity profile itself, the buy and sell lean near price, how busy the tape is compared with its own recent normal, whether the busiest price is holding still or migrating, and how healthy execution conditions are right now. Every one of those is measured against the market's own recent behaviour rather than a fixed threshold. How they are scored stays in the Expert Advisor.
Why breakouts do almost all the work
This is the honest part. The breakout mode carries the product. The reversal mode contributes a few percent of the net result. It exists, it is real, and I dont oversell it.
The reason is costs. Reversion trades aim at mPOC, which is usually not far away. I once tested point-of-control mean reversion as a strategy of its own, and the gross edge per trade was smaller than the spread it had to pay. Breakouts, when they are accepted, can travel far, and far is what pays for the spread, the slippage and the losers.
I also tested using the busiest price level as the breakout reference instead of the edge of value. It halved the profit per trade. The edge of value is where the auction actually changes character, so that is where the measurement belongs.
What it costs
Most breakouts dont become big moves. Many fail and come back inside value, and the stop takes them. Many stall, and the break-even rule turns them into scratches. The result is carried by a minority of trades that are accepted beyond value and keep going. That shape is uncomfortable to sit through by hand, which is a large part of why I run it as software.
And the method needs gold to move. On quiet days, when the daily range is small, there is little value to leave and little room to travel, so the system mostly stands aside.
Where this lives
On TradingView the MasterVP indicator draws the master and local levels and shows the read, and the order stays with you. On MT5 the Expert Advisor executes these setups on the settings you configure, your risk limits included.
The takeaway
Two directions, two families: leave value with evidence, or come back to it after a failed escape. If you take one thing from this chapter, take the asymmetry. The trades that leave value with evidence are the ones that can travel far enough to matter.
When you trade value areas, do you lean toward breakouts or toward fades, and have you ever measured which one actually pays after costs?
From discretionary to systematic, part 6 of 15.
Previous: MasterVP 1/10: the map. Volume profile, mVAH, mPOC, mVAL, and why value matters
Next: MasterVP 3/10: the entry. Why a breakout must clear value by about half an ATR
Part 6 of the From discretionary to systematic series, also published as an X Article. Educational purpose only. Not financial advice. Figures cited are backtest and research results unless stated as live, and past performance does not guarantee future results. Every trader remains responsible for their own risk settings and decisions.